
I wrote this “How to Paint Your Kitchen Cabinets (like a pro)” tutorial after painting my own kitchen cabinets almost 10 years ago. I have since quit my corporate job and started a small business painting cabinets and furniture, and have painted hundreds of kitchens, so this tutorial has become somewhat of a living document, based upon loads of research, experience and practice. I try to keep it updated with new products, tips and techniques, since I am continuously learning as I continue to grow my business and hone my own skills.
If you’re interested in reading about this project in process, you can read about it here and here. You can see my kitchen reveal here and the full evolution of the kitchen in photos here.
If you’re interested in ONLINE VIDEO TRAINING, and want to take things at your own pace, with a pro at your side through the process, click here.
If you’re in the Dayton/Cincinnati area, and want a quote for painting your cabinets, contact me.
********************************************************
Do you want to know how to paint oak cabinets?
More tips and tricks for tackling oak cabinets, including how to hide the grain, and some great go-to paint colors! Check out my post on how to paint oak cabinets for all of the details! Here are some of my favorite oak cabinet transformations from my portfolio:
- A builder grade kitchen turned custom
- Painted cabinets in an oak kitchen redo
- A client kitchen redo with an island reinvented
Do you have questions about prep?
Are you concerned about prepping your cabinets? Are they unfinished or previously painted? Check out this post on 5 Cabinet Painting Problems Solved.
Are you looking for the right tools to get the job done?
The more projects I do, the more tools and products I find. Here is my latest list of great tools to get the job done more efficiently and with a great finished look. Five Favorite Tools for Painting Cabinets and Furniture.
Do you have questions about using a paint sprayer to paint your cabinets?
Check out this post from my “Painter in Your Pocket” series as your guide.
*********************************************************
*This post contains affiliate links*
I apologize in advance on the length of this post, but I wanted to make sure I covered everything in one fell swoop. That said, I’m sure I forgot something, so feel free to ask any questions you may have.
I have put together a FREE COMPREHENSIVE SUPPLY LIST for you, and you can link to it here, click on the image below, or you can shop here for everything you need.
I did a great deal of planning and research before tackling this project, and continue to develop and learn now that I’m painting cabinets for clients, so I hope you’re able to learn from my obsessive-compulsive tendencies.
First things first. These are some of the most important things to know and consider before taking on a project like this.
1. Unless you have hired help (or a household that will take on all of your responsibilities while working on this), the rest of your house will suffer during this process.
Ok, maybe I’m being a bit dramatic here, but this was my personal experience. However, I should preface this by also mentioning that I worked full-time (outside of the home), when I painted my cabinets, and spent just about every non-working moment on this project in order to get it done. So, for me, this meant that my typical laundry “pile” turned into a laundry “mountain”. The entire house was a wreck, and the hubby and kids had to fend for themselves for the 2-3 weeks that I spent focused on painting. My kids may or may not have eaten cereal out of the box for dinner several nights in a row.
2. Invest in help from the experts.
I had three big questions in researching this project:
- How do I best prep my cabinets for painting?
- What kind of primer should I use when painting my cabinets?
- What kind of paint do I use to paint my cabinets?
- How do a I choose a paint color?
I ended up finding some cabinet door samples that I liked, and had them color matched for my kitchen.
Here are the samples I used and had color matched for the island and the kitchen cabinets.
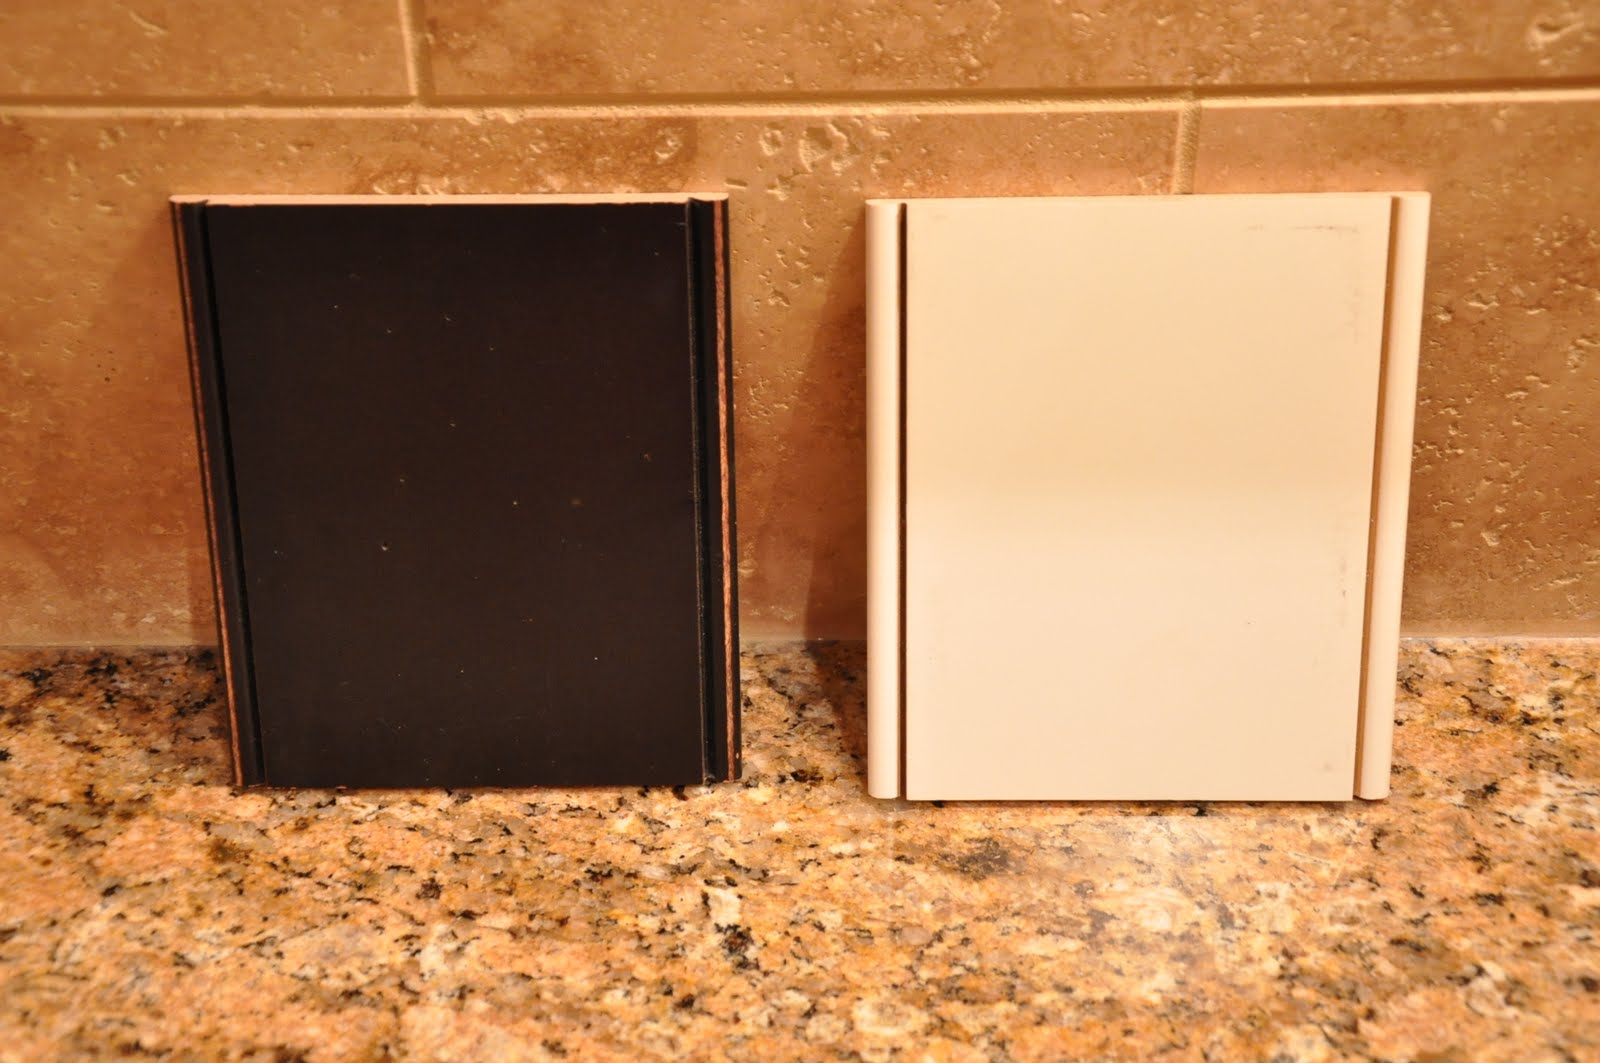
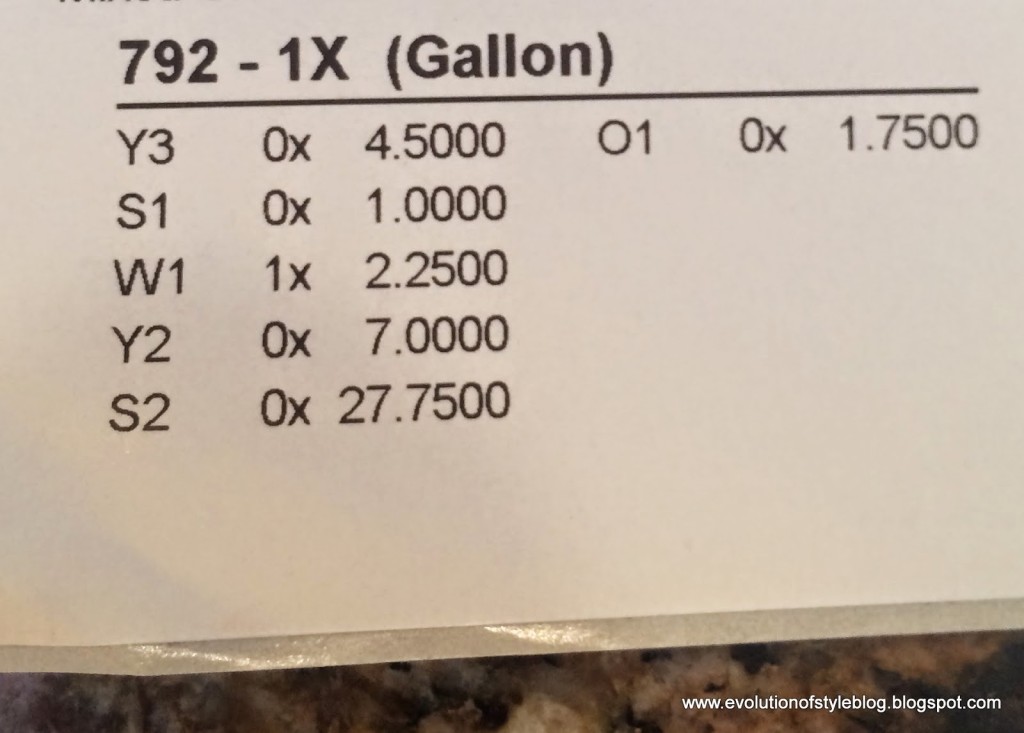
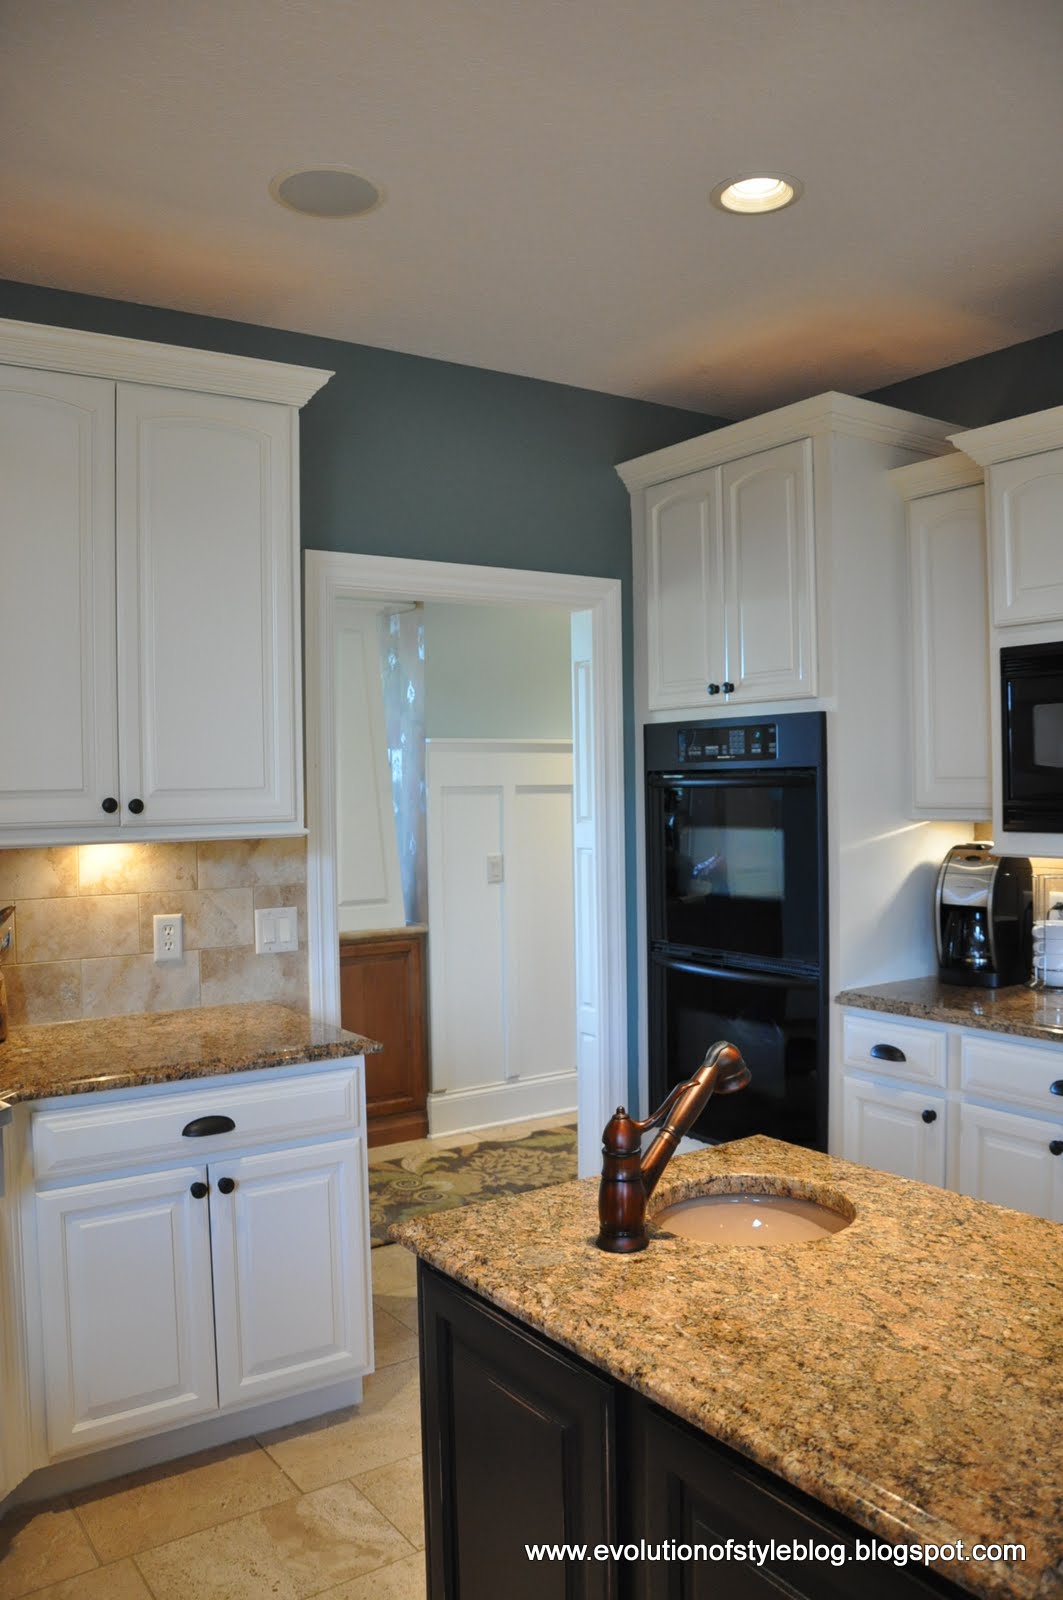
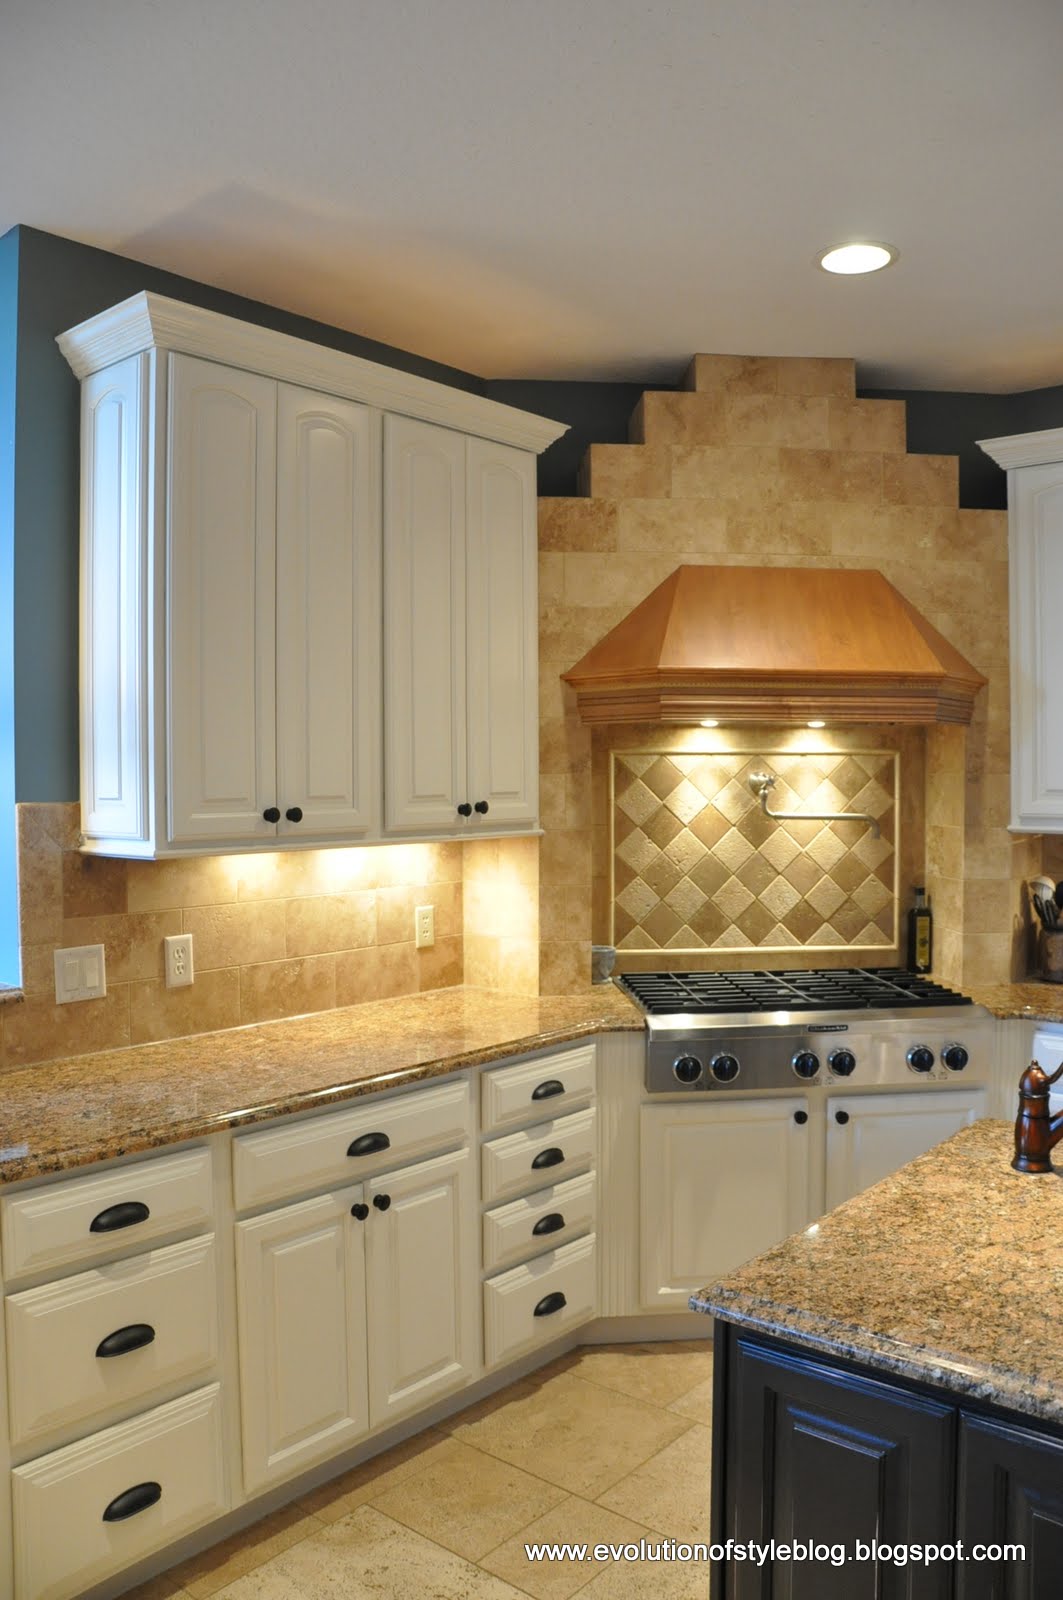
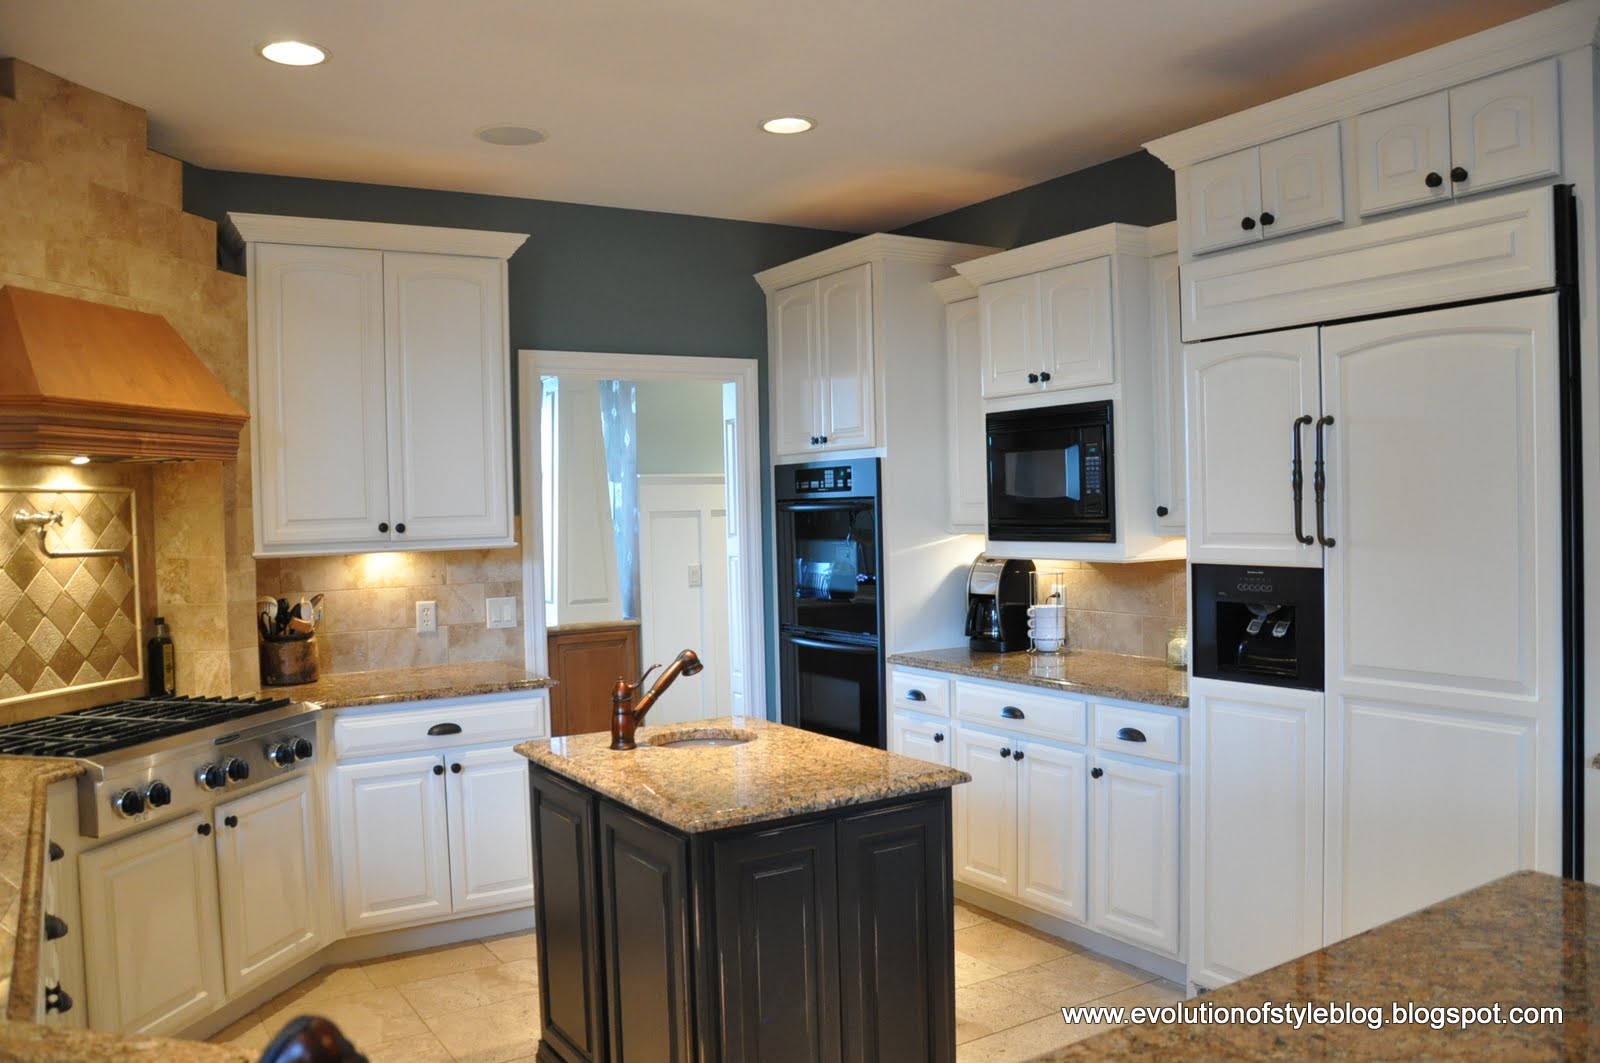
What color did you paint your cabinets?
I have gotten a lot of questions about the color that I used on my cabinets. As I mention above, I had the cabinet samples above color matched for my kitchen paint colors. Below is the formula for the white I used on a bulk of my cabinets. This is a formula for Benjamin Moore paint, and I used their Advance paint product for my cabinets. Don’t use this formula for other paint manufacturers.
If you are looking for help choosing a white paint color for your cabinets, check out my favorite white cabinet colors here.
3. What is the best method to get the job done and make it look professional?
I know there are a lot of opinions and methods out there, but after painting the kitchen island, (using a sprayer for the doors, and hand painting the frame), I knew that painting the cabinets with a brush would not produce the look that I wanted, since I have a lot of raised panels and detail work.
However, if you don’t have a lot of raised panels on your end cabinets, I say paint your frames with a brush/roller. I still recommend spraying your doors and drawers, but there is some wiggle room with the frames. Just make sure you use a high quality brush like this one, and mohair rollers. Using high quality tools will give you a high quality finish and help to minimize brush strokes.


The clincher for me was seeing a video of someone painting kitchen cabinets with an HVLP sprayer. HVLP = High Volume, Low Pressure. It is a dream for a project like this since you have so much control over the spray in terms of volume and area. You can dial it down to a targeted, narrow spray for corners and small areas, or you can open it up to give you a much broader spray as well.
However, these paint guns can be expensive, since they hook up to a turbine (which I now have and use for client kitchens). But, I did some (more) research, and found one that I could hook up to our air compressor (ours is a 6 gallon 150psi, which was more than enough power) for a fraction of the cost. Enter the Wagner HVLP Conversion Gun. This is the gun that I used when I painted my own cabinets, and the results were nothing less than flawless.

If you don’t have an air compressor, you can go with a gun like this Graco TrueCoat Plus II paint sprayer. Thrifty Decor Chick used this to finish off her cabinets after my house call when I had the opportunity to walk her through the process. She loved this sprayer, and if you saw her kitchen, you’ll see that it got the job done beautifully.

So, let’s get to the details. How did I prep my cabinets? What type of paint did I use? What finish did I choose?
Paint Prep
Before we dive in too deeply on paint prep, let me first say that this is not a step where you want to take short cuts. I know a lot of paints claim that they are “no prep”, but if you’re investing the time to do this kind of DIY project, and you want a professional finish, you need to put in the work. I can’t tell you how many times I’ve cleaned cabinet doors and then sanded them, only to reveal all sorts of gunk that I never would have noticed otherwise. Since my cabinets didn’t have a glossy finish on the to begin with, I cleaned them Krud Kutter Gloss-Off, which is a great all-in-one cleaner AND deglosser and then gave them a light sanding. I have since invested in a nice orbital sander and dust extractor and use it for client jobs, but I will say that my light sanding has held up nicely in my own kitchen.
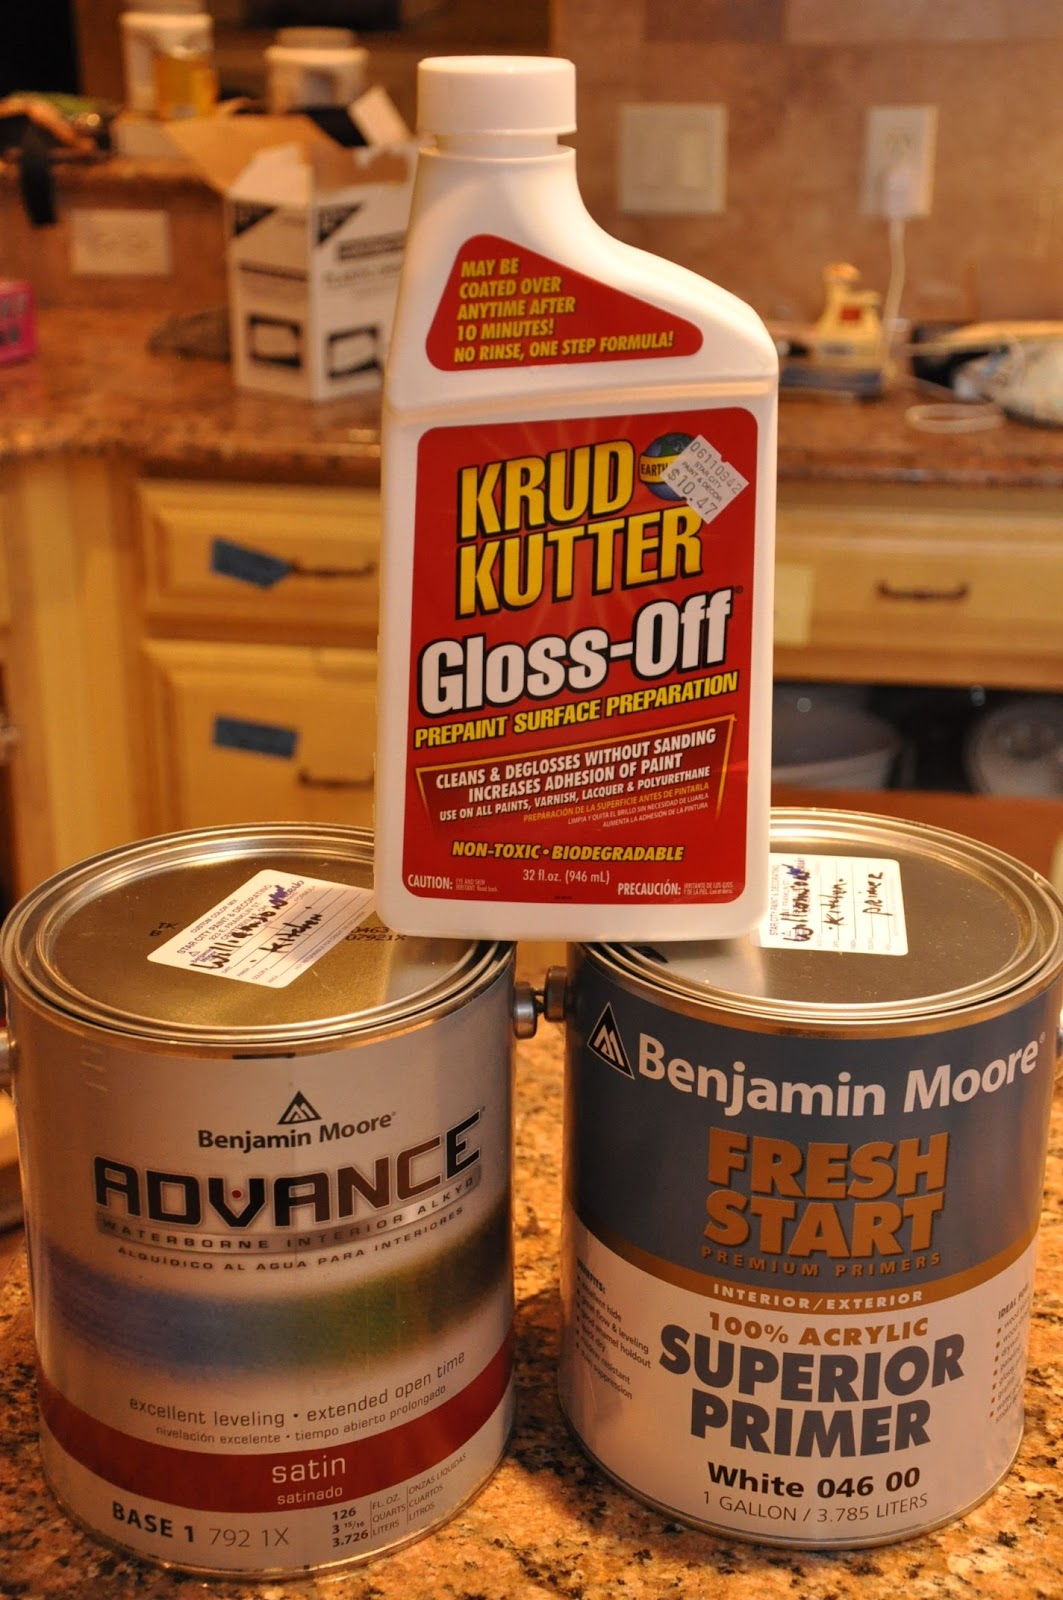
You can see the primer and paint that I used here as well. Benjamin Moore’s Fresh Start Primer and their fantastic Advance paint. Again, I’m going on the advice of the experts here (he recommended a different primer for glossy surfaces, but I can’t remember what). I cannot say enough good things about this Advance paint. Oh. my. goodness. The paint store guy/expert said, “It’s revolutionary.” He said that it’s basically an oil-based paint that acts like a latex (even though it is a latex paint). You get all of the good points of an oil-based paint, with none of the negative. It hardens like an oil, wears like an oil, but cleans up like a latex and it doesn’t smell like an oil! See? Revolutionary.
For a more detailed breakdown on prep, you can check out this post from my “Painter in Your Pocket” series that is exclusively dedicated to prep work.
I have experimented with a multitude of primers over the past few years, and while Fresh Start has held up nicely on my own cabinets, I am also a big fan of SealGrip by Porter Paints. It’s awesome for oak cabinets too, in that it keeps the oak grain from bleeding through the paint, and it’s water-based, which I love. Plus, it really holds up when cabinets need to be transported for clients. But as of lately, I have switched to using Zinsser BIN shellac-based primer. It sticks to EVERYTHING.
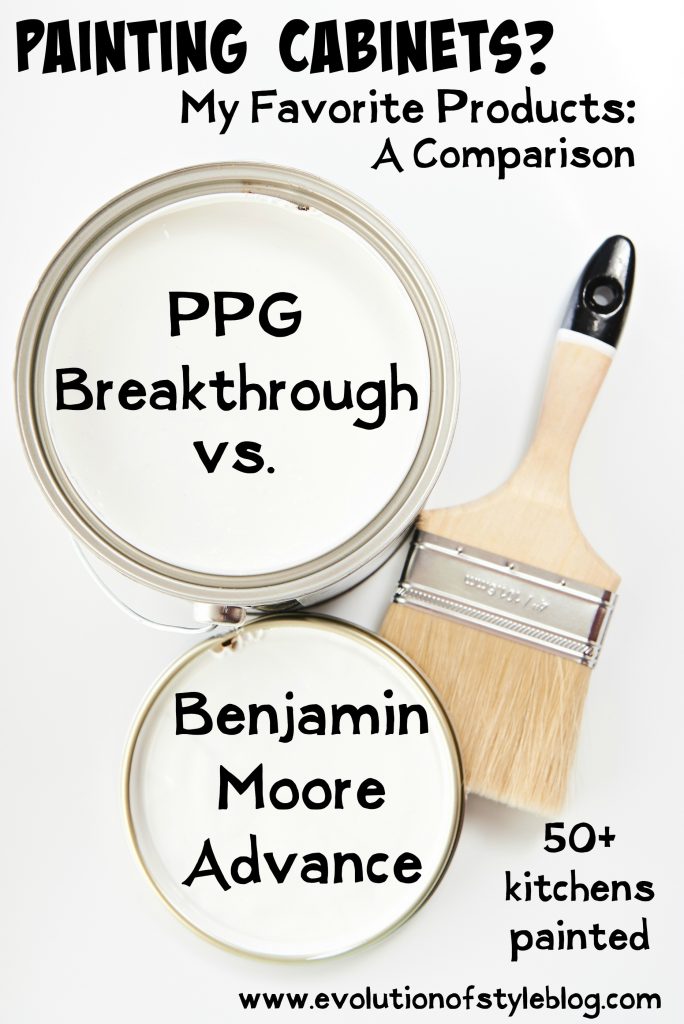
If you’d like to look at other paint options, I shared a comparison of two great products that I love. They’re both solid products, with pros and cons associated with each. It all depends upon your priorities and preferences.
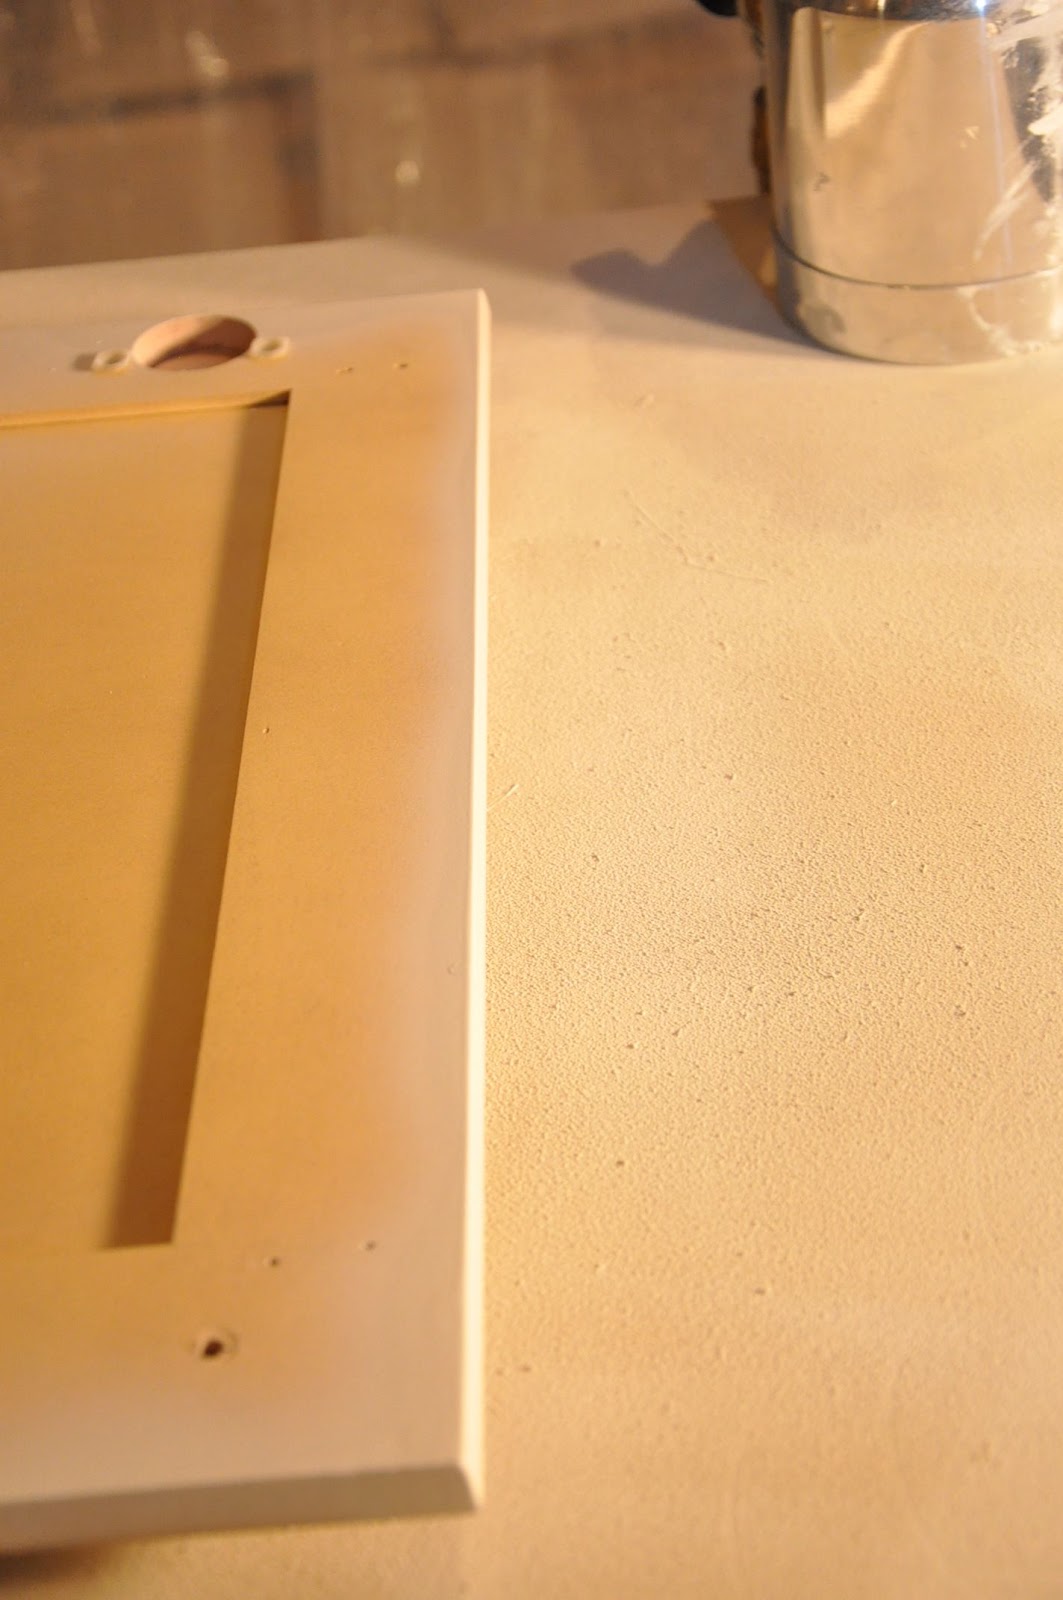
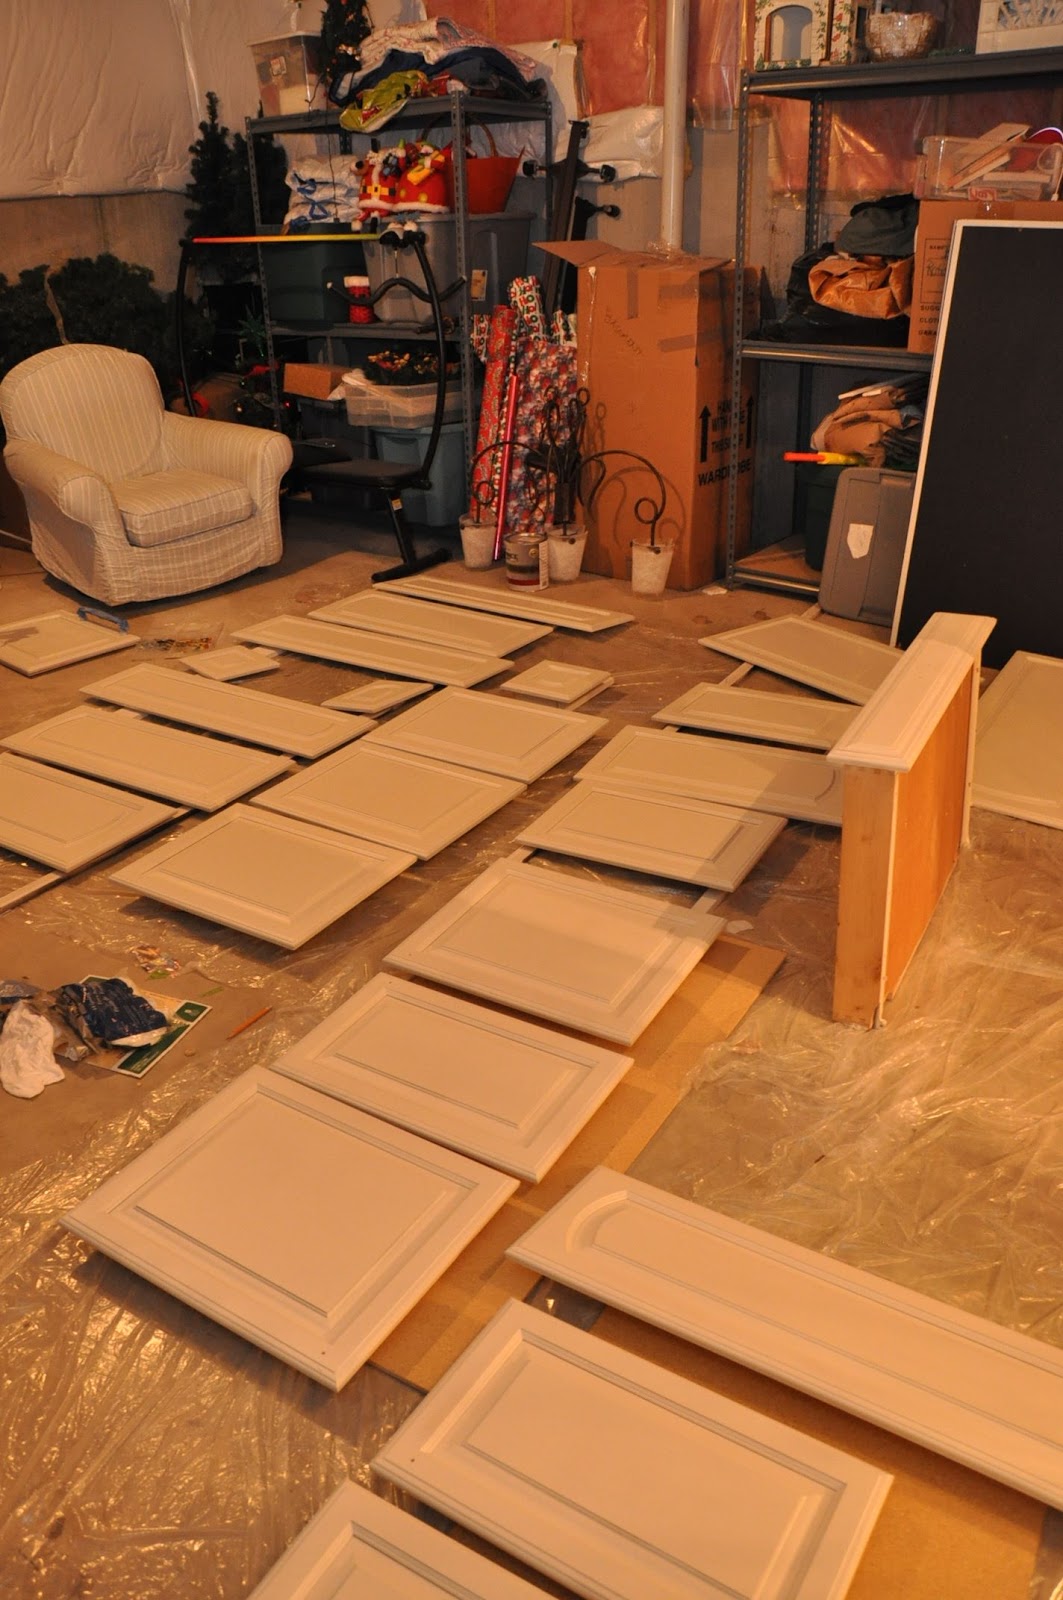
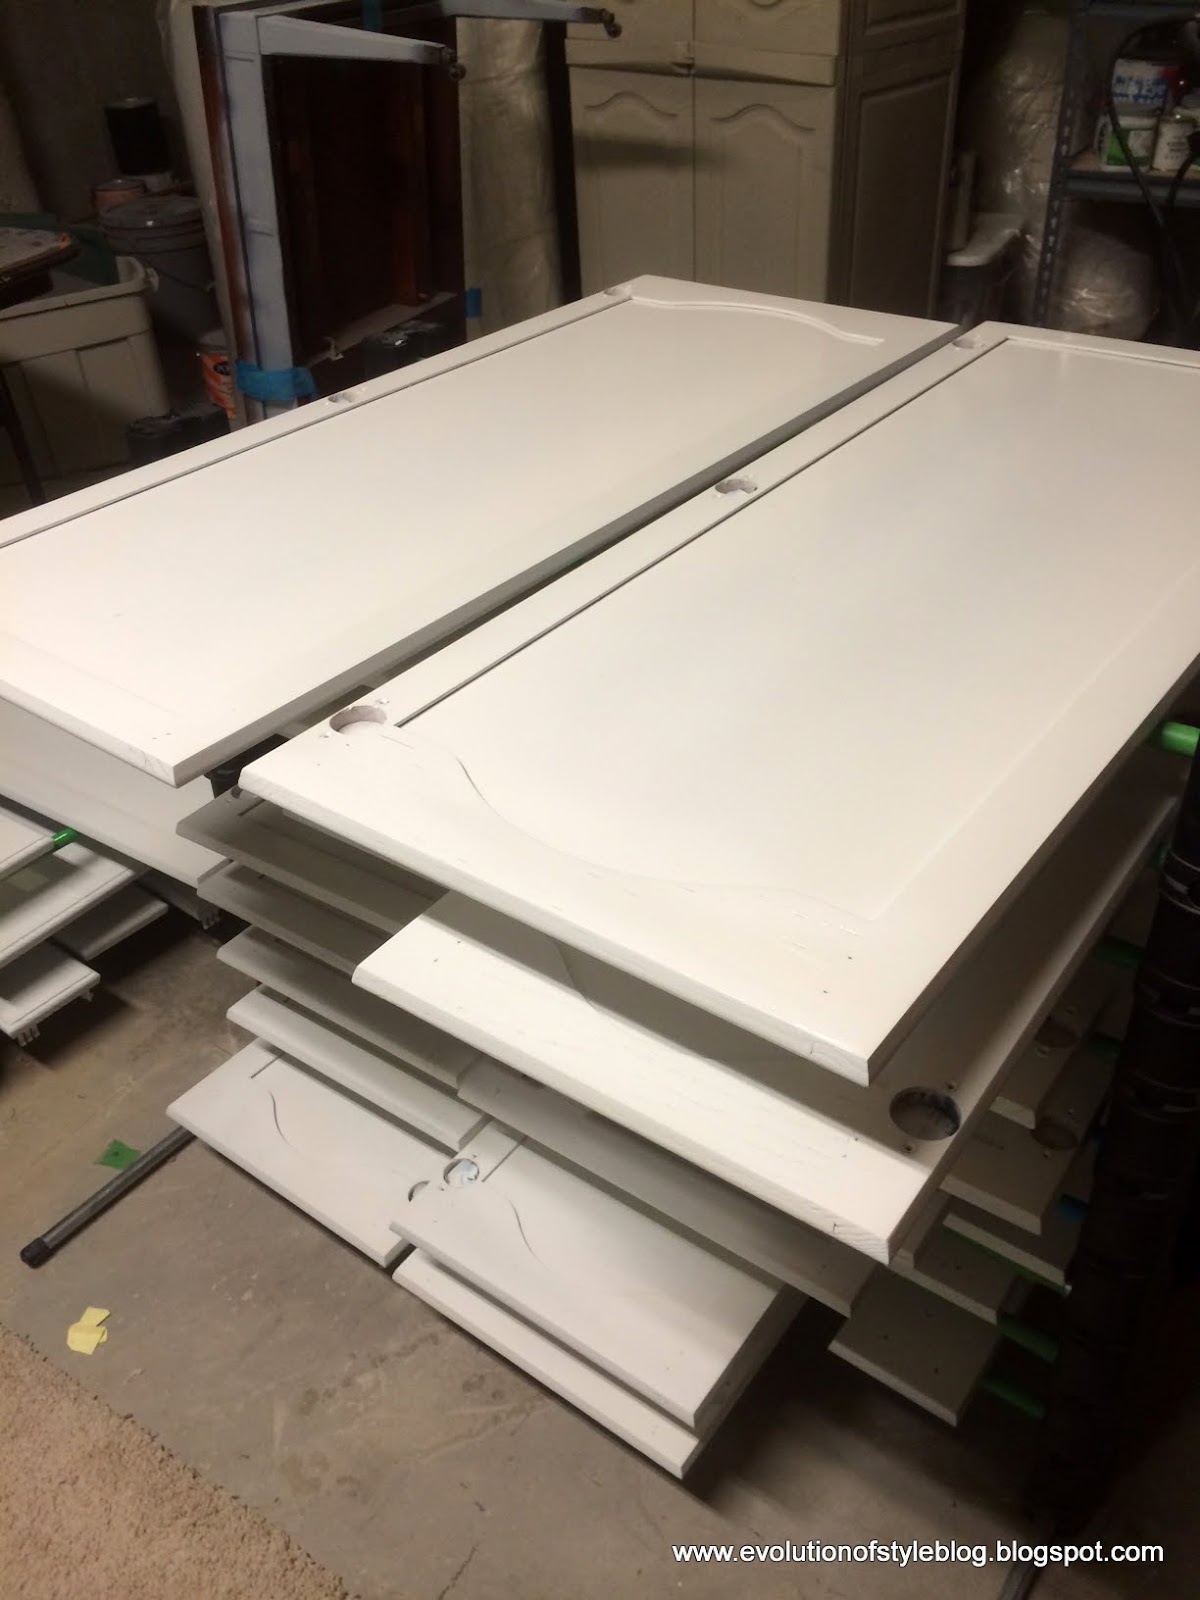
But, before you can get moving with your actual priming/painting, you need to remove your cabinet doors and drawers. I highly recommend putting together some sort of numbering system so that you don’t lose track of what goes where. While it all seems to make sense when you’re planning, trust me that you will be glad you did this when your paint-weary brain goes to put the doors and drawers back.
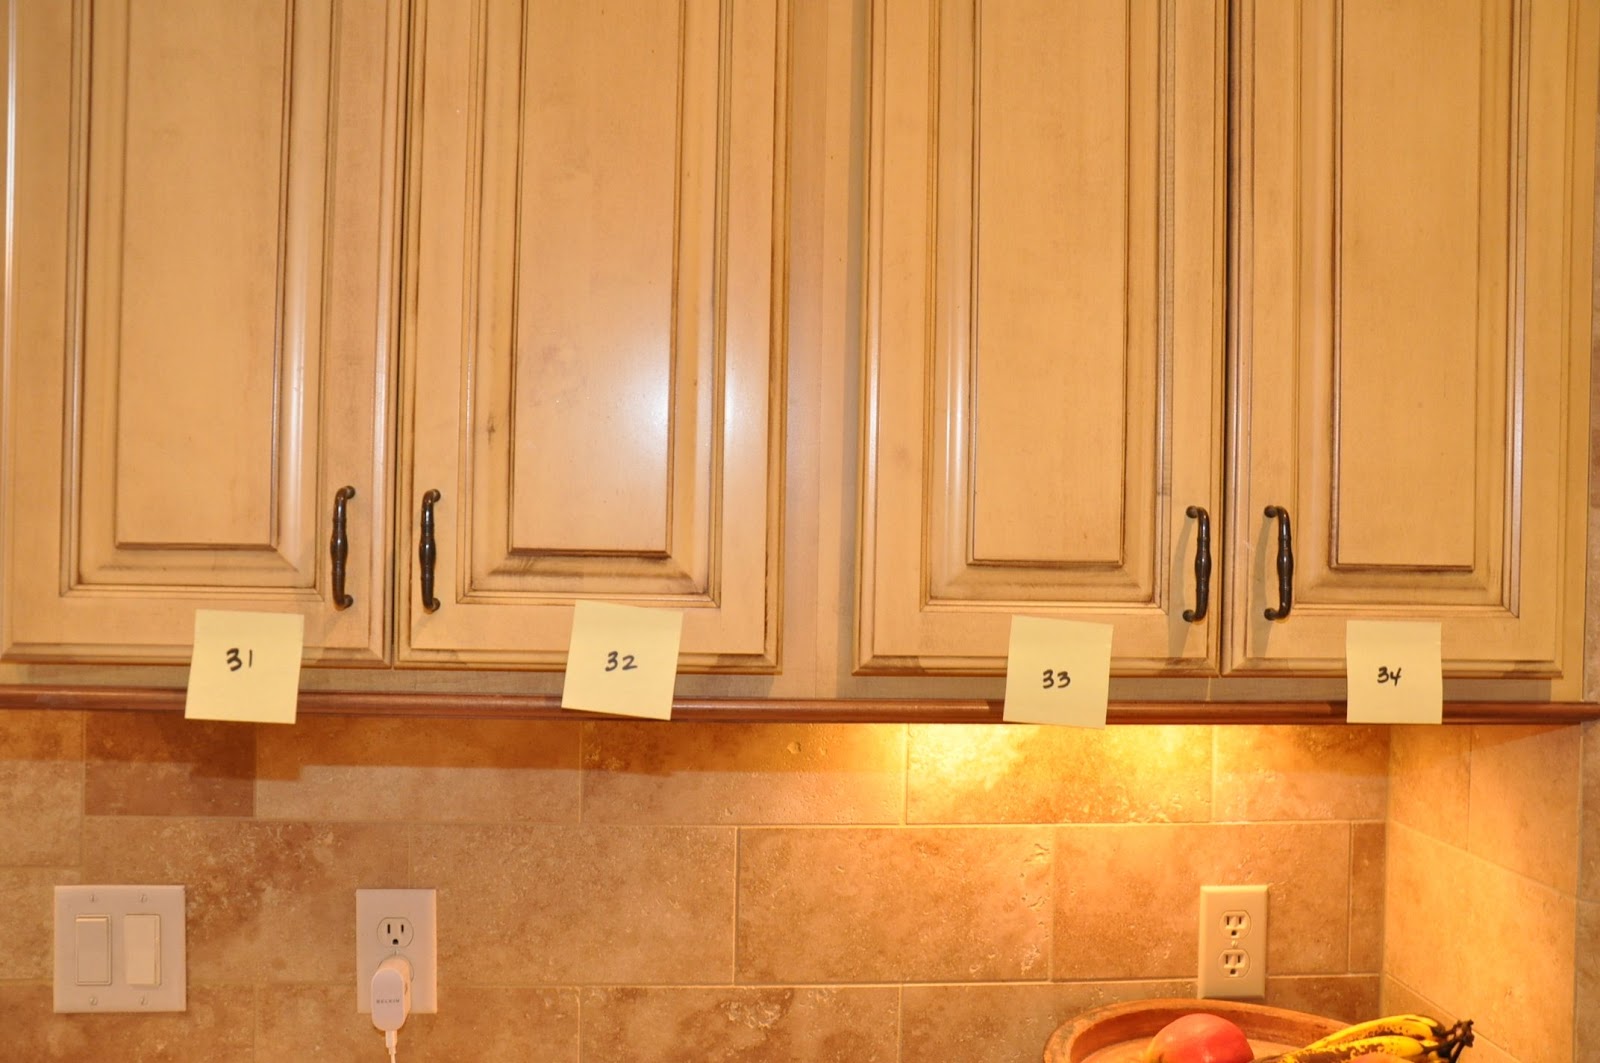
TIP: I started out my labeling like this, but the best way is to take a piece of painter’s tape and number your cabinet doors and the corresponding frame so that it’s easy to match them up when you reinstall. Put the hinges in a Ziplock bag, and store them in the corresponding cabinet/drawer space. Take the time to number your doors and drawers, because things can get ugly really fast when reinstalling your doors/drawers if you don’t.
Below, my cabinet coding translates to – Right of stove, cabinet #28, right bottom (RB). Believe me, when you’re exhausted and swimming in a Sea of Cabinets that need to be put back in their proper place, you’ll be thankful for this little extra help.
This is especially important if you currently don’t have knobs on your doors, and you’re planning on adding them. Label the door so that you know whether it’s a right or left sided cabinet so you make sure to drill your holes in the correct spot. Just trust me on this.

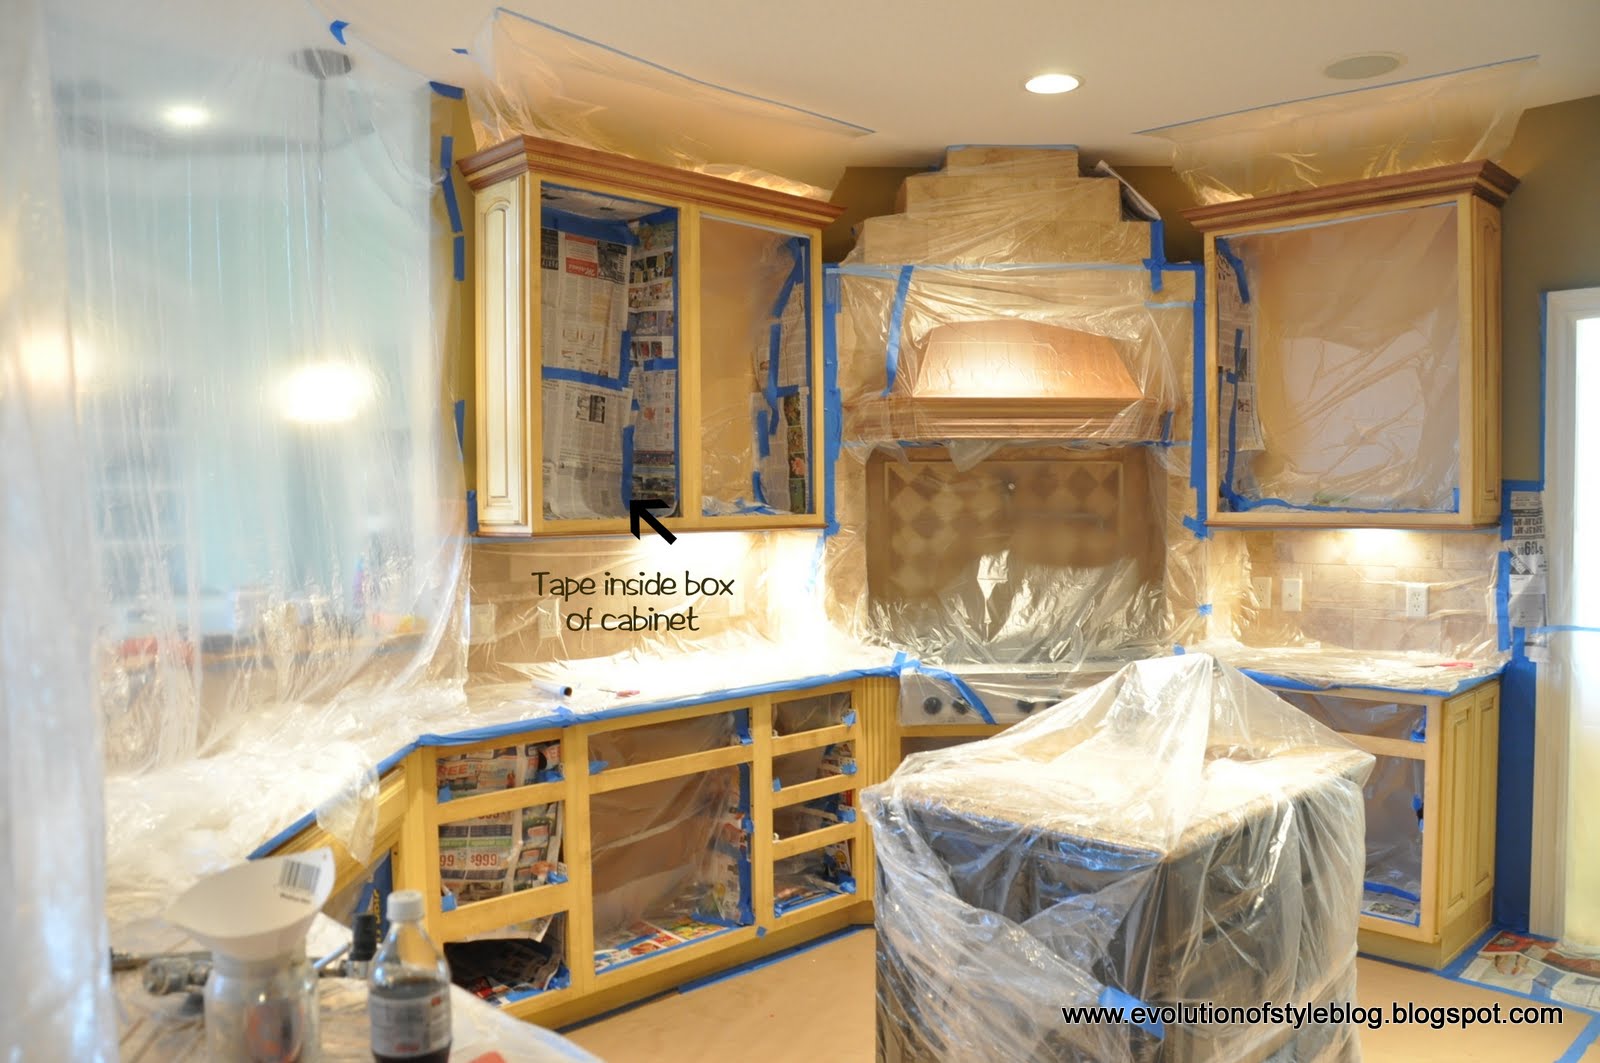
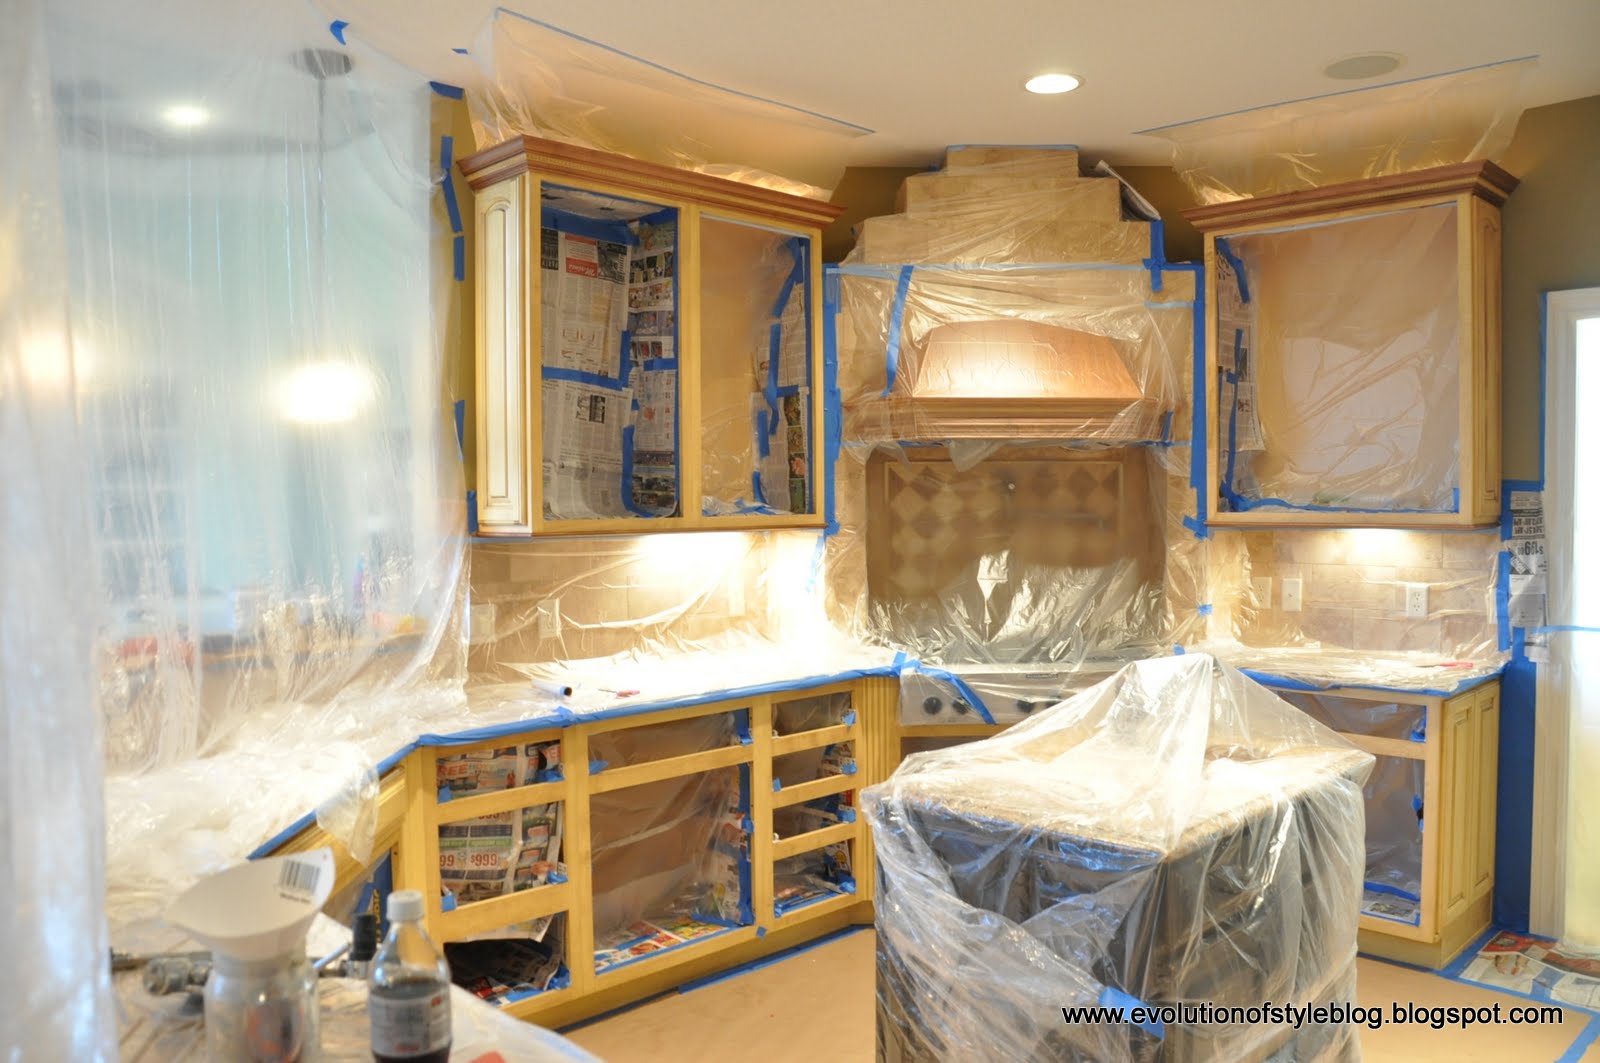
You will also need to tape off the insides of the cabinets, the countertops, floor, even some of the ceiling. If you’re planning on painting the walls, do it after you paint the cabinets – you’ll save some time and trouble in taping off the walls in addition to everything else. This was, by far, my least favorite part of this project. Taping off the insides of cabinet frames is harder than it sounds. But, I can offer you some advice that I learned along the way.
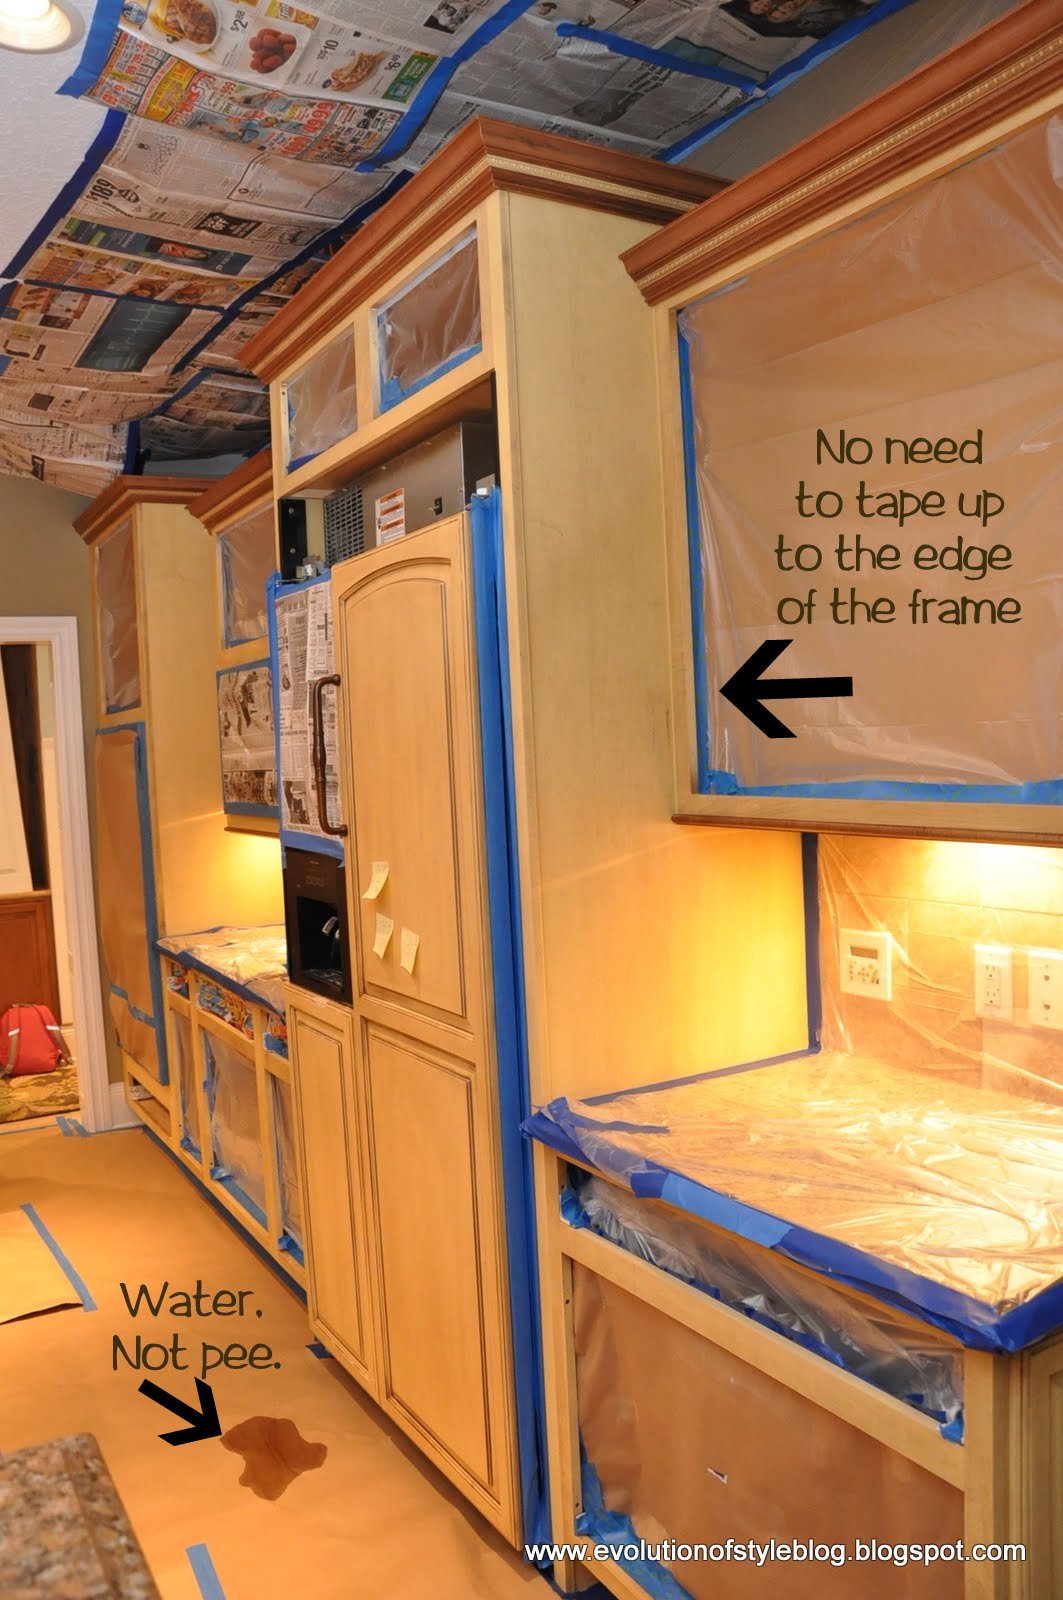
TIP: Tape off the bottom, sides and top of the frame first (newspaper works well for this), and then tape off the back of the inside frame.
You can see what I mean here:
Versus here where I was trying to tape off right at the edge of the inside frames. Don’t ask me why it took me so long to figure this out, but it was a maddening process. (And don’t mind the water spot on the contractor paper – it’s from the water dispenser in the fridge. I swear.)
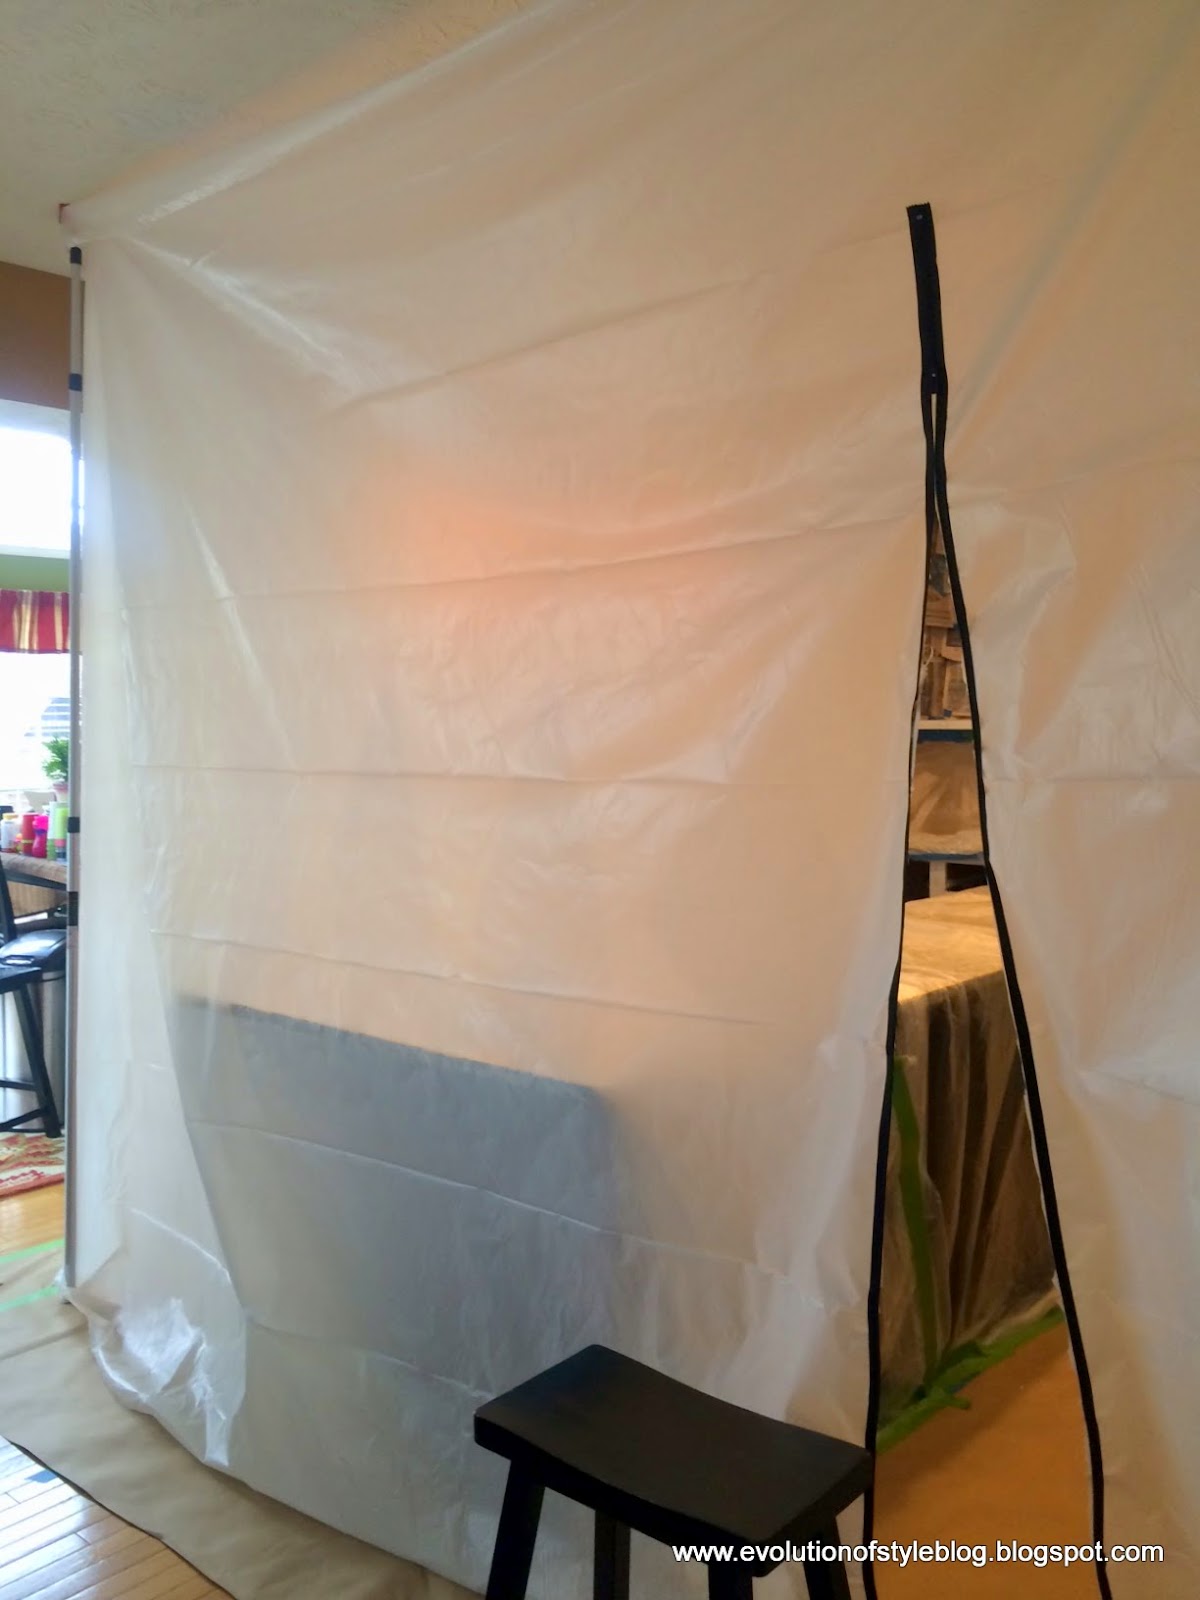
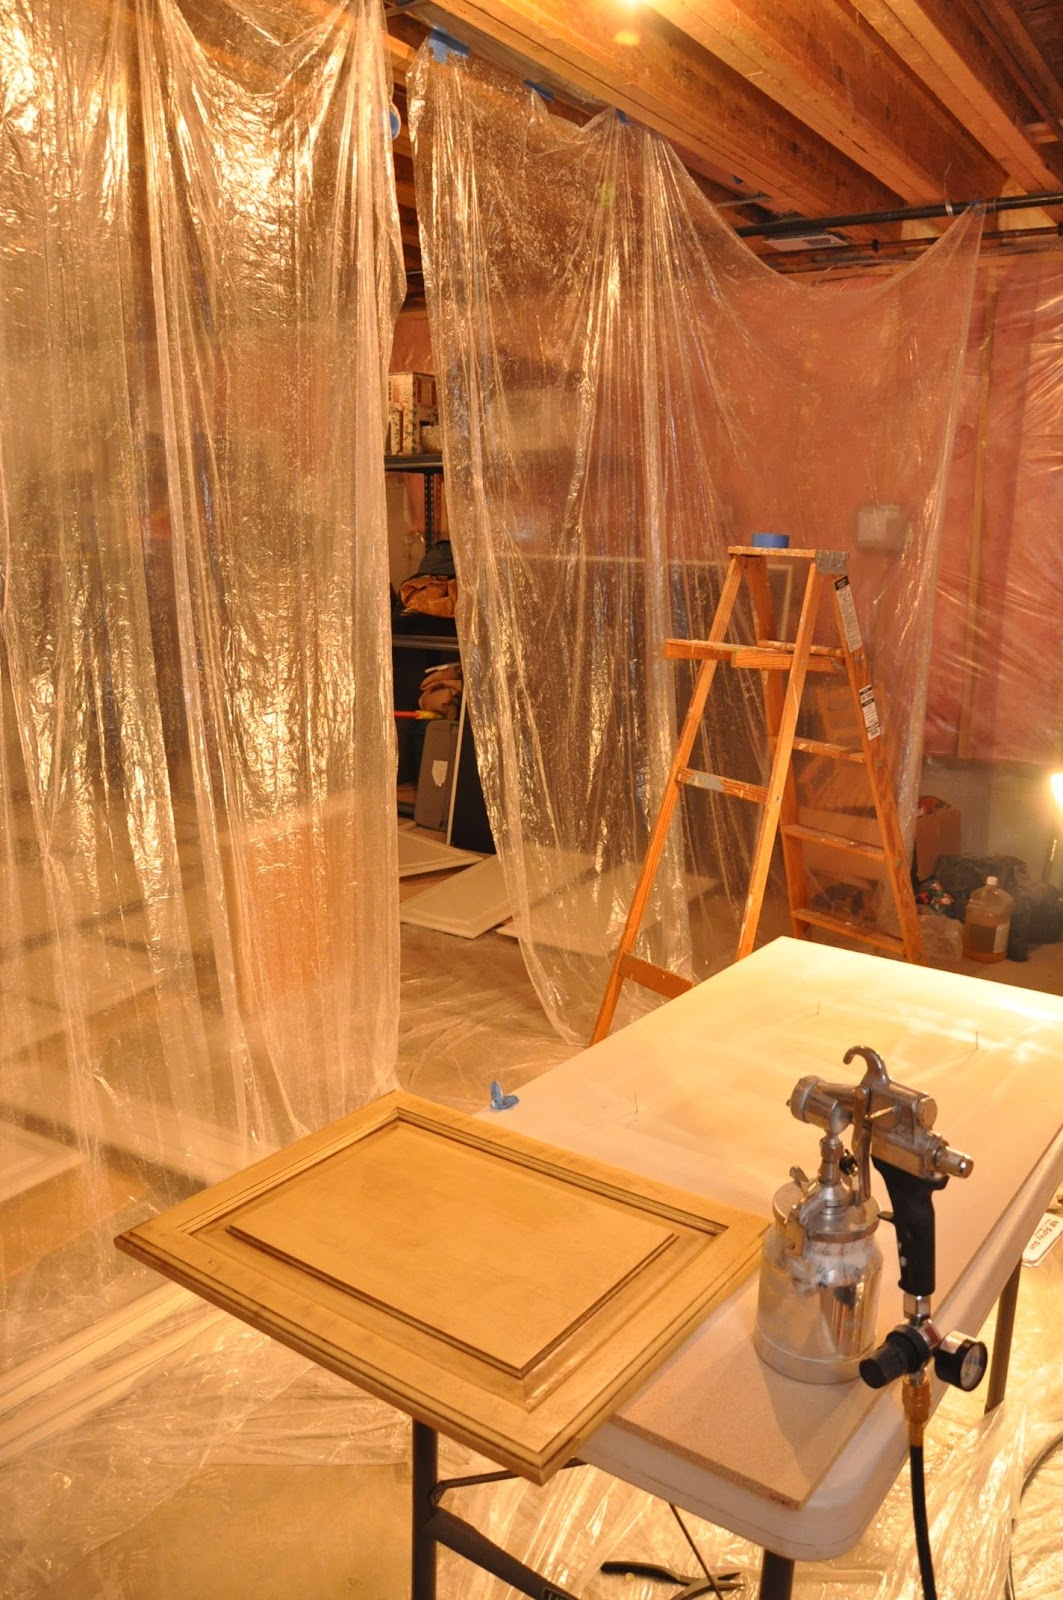
You will need to go all Dexter-like and tape off any open areas in your kitchen to avoid spray particles from floating through your house.

 |
| Note: I don’t flip my cabinets and paint the other side without waiting. I have never been successful in that, and if you are, I’d love to see your technique. But, these are great to use when spraying your cabinets. |
Priming and Painting
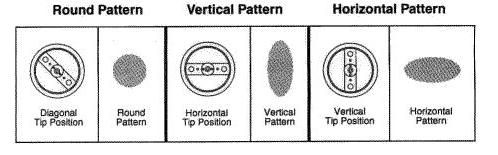 |
Paint pattern size:
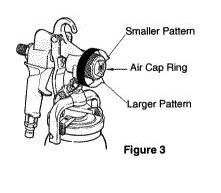 |
Air and paint flow control:
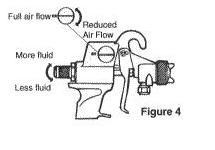 |
Then, fill in the center area, working side to side, ensuring complete coverage.

- Clean and degloss the frame surface with Krud Kutter
-
Lightly sand the frames (I used 220 grit sandpaper)
-
Remove excess dust and wipe clean with tack cloth
-
Prime cabinet frames and allow to dry 24 hours
-
Lightly sand and use tack cloth before painting
-
Paint cabinet frames with 2-3 coats of paint, waiting 24 hours in between coats
-
Wait 2-3 days for paint to cure before rehanging doors


I hope you found this tutorial helpful, and most importantly, I hope you’ll begin to see that you can do this project!
Interested in cabinet paint colors that aren’t white? Check out this post on my Favorite Non-White Kitchen Cabinet Paint Colors.
In case you missed it – here is my post with tips and tricks on painting oak cabinets.
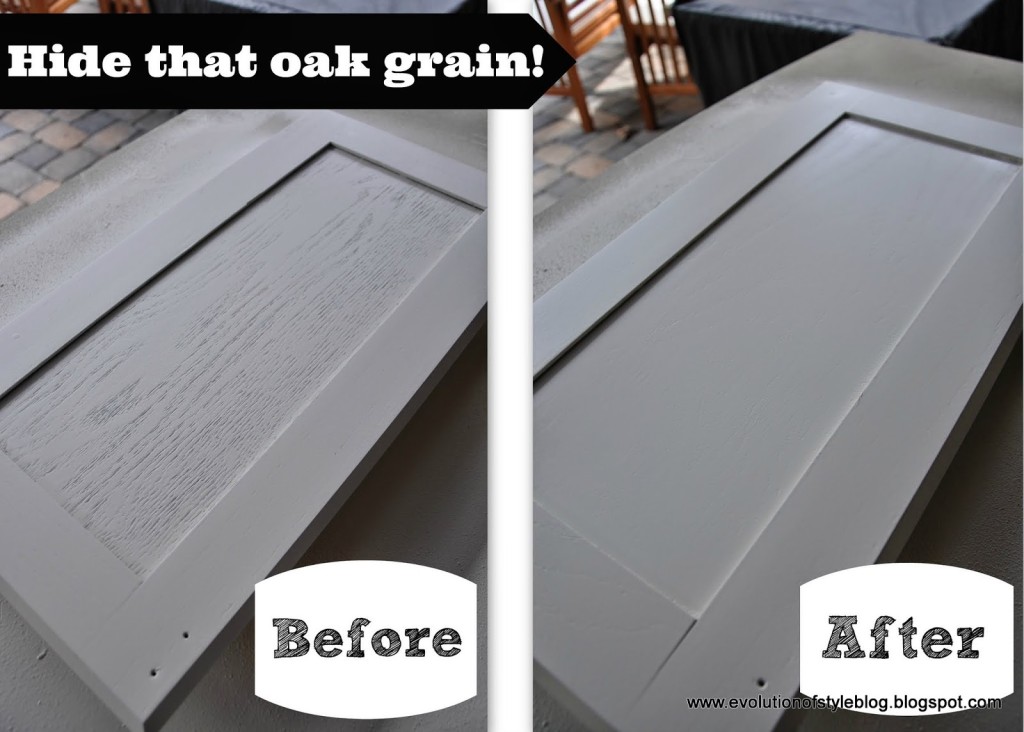
In April 2014, I gave Behlen’s Grain Filler a test drive to get rid of the oak grain on a cabinet project.
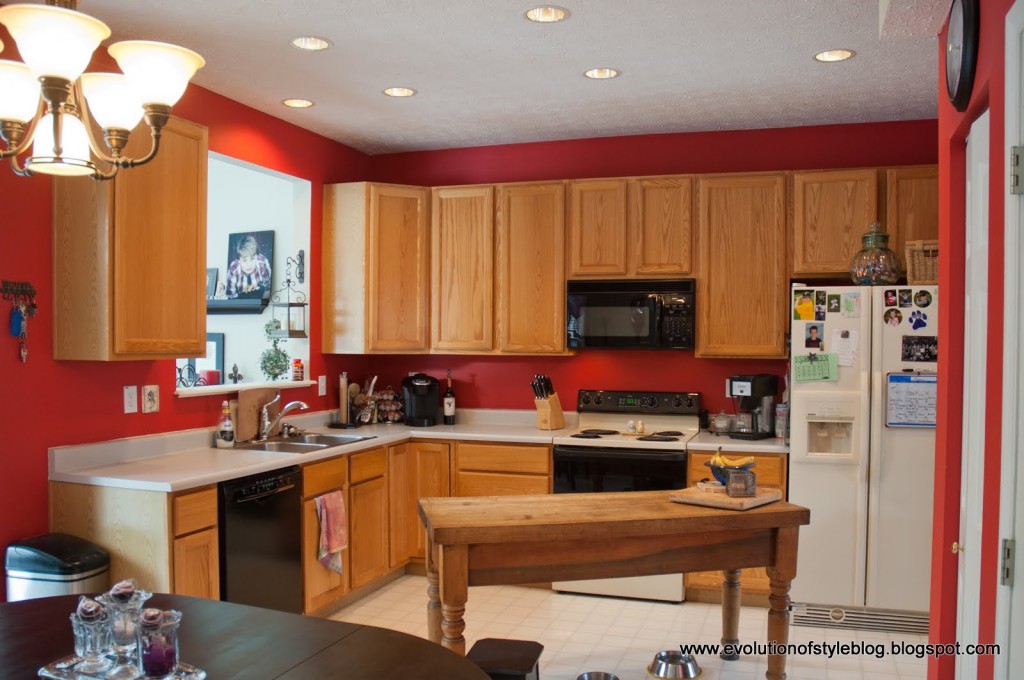
Here is a post showing an oak kitchen transformed (by me) for a client.
Before:
After:

Here are some links to some other resources that might be useful:
Melissa at 320 Sycamore
Traci at Beneath my Heart
Sherry and John at Young House Love
Marian at Miss Mustard Seed
Traditional Painter Hand Painted Kitchens and Furniture – a treasure trove of information from seasoned pros, on materials, supplies, prep and technique, along with loads of photos of kitchen transformations. One of my favorite resources!

264 Comments
Michelle
December 3, 2012 at 1:51 pmLove your detailed instructions and photos! Did you use Floetrol (or another additive/thinner) with the Advance paint? I'm questioning the thickness of the paint when using the Wagner Gun of Awesomeness to get a super-smooth finish. Thanks for your help and inspiration in finally tackling my 90s oak kitchen cabinets. Ready for change!
Katie
December 18, 2012 at 2:37 pmThanks for the informative post! I just got my sprayer and am about to start my cabinet project. One question for you- did you purchase the #4 projector set separately from the HVLP gun? There was a note in my box saying you needed to buy that part to spray latex based paints. Also, how much did you thin your paint? Your help is much appreciated!! Thanks! Cabinets are beautiful!!
Ali B
January 17, 2013 at 3:24 amI have been wanting to paint my kitchen cabinets for MONTHS! In all of my online searching, your blog/tutorial was the most comprehensive I've seen! I was feeling overwhelmed and uncertain until I read this post. Now I am fired up and ready to tackle my cabinets! Thank you so much for all the tips and tricks! Now…just gotta get the weather here in Ohio to warm up enough to stage my garage as the "Dexter" zone! I can't wait!
petersenplace
January 17, 2013 at 6:09 pmWow – your kitchen looks amazing!! Thank you so much for this awesome post. I know have the courage to tackle this project. Looking forward to getting started! Enjoy your kitchen 🙂
stefferskl7
January 26, 2013 at 12:52 amHi I have been drooling over your kitchen for about a year now! I am about to purchase the Wagner sprayer and I wanted to see if you bought the #4 Low CFM Projector Set, 1.8MM? I saw alot of people comment it worked best for latex paints? Or did you just use the tip that came with the gun? Your insight would be appreciated!
sodahoney
February 13, 2013 at 5:35 pmi hope you answer this. What size air compressor do you have?
Jenny
February 14, 2013 at 12:14 amI have a Bostitch 6 gallon/150 psi air compressor.
It also says 3.7CFM@40PSI and 2.8CFM@90PSI on it, if that helps at all. 🙂
Nicole
February 22, 2013 at 4:58 amI work for a Benjamin Moore store and the Advance paint is one of my favorite lines. I would like to clarify that this not a latex paint it is a 100% alkyd formula water-dispersible alkyd. It is also a Low voc paint that is soup and water wash up. I have used it on a lot projects I normally just use a soft nylon polyester brush and have great smooth results. One tip I would give would be to wash your cabinets first with a degreaser or TSP you should clean first before sanding.
AllisonF
February 27, 2013 at 3:49 pmI am wondering how the paint is holding up now? Just thinking about all my options! Thanks for sharing.
Jenny
March 5, 2013 at 9:05 pmThe paint is still holding up very well and I'm going to be using it on the cabinets I'm spraying for a friend. I highly recommend it!!
katig
March 5, 2013 at 8:23 pmHi, I was wondering if you are still happy with how the Advance is holding up on you kitchen cabinets? I am considering using it on mine. Thank you!
Jenny
March 5, 2013 at 9:04 pmI'm very happy with the Advance paint, and it is holding up extremely well! I'm getting ready to spray some cabinets for a friend of mine, and will be using the Advance again. The only tip I would offer is to make sure you are extremely thorough with the primer around the areas that get the most wear, and to be careful when choosing the cabinet bumpers for your cabinet doors. If you get some that have any kind of "stick" to them, they can cause a problem.
But I can't say enough about the Advance paint – it's fantastic!
katig
March 6, 2013 at 4:54 amThank you so much for getting back to me and for the tips Jenny!
Lulume
April 6, 2013 at 3:42 pmYour cabinets look great! I just purchased the same sprayer, but realize now I "maybe" needed the #4 projector set. It seems you didn't use it and had great results. What do you think? They also suggest thinning the paint and I read in your comments that you did not. Is that true? I'm getting ready to practice on my laundry room cabinets would love to clarify this point. I plan to use the same type paint/primer you did. Thanks for your help.
Jenny
April 15, 2013 at 11:51 amI purchased the #4 projector set, but have not used it. The projector set that came with the gun worked fine with the Ben Moore paints used here. I have thinned the paint via a strainer and with Floetrol before, but not always, and haven't had an issue. I hope this helps!
Robin G.
May 15, 2013 at 4:42 pmI have the same concern. I ordered the #4 set because the guy at gleempaint said I needed it.
Jenny, did you thin your paint? Did you use the #4 set?
Jenny
May 16, 2013 at 2:15 amRobin, I did not use the #4 projector set. I bought it, but have not used it. In painting my friend's kitchen cabinets, I did thin the paint and on some occasions I straind it too. But, I didn't always remember to do it, and honestly, I didn't notice a difference in thinning vs. not thinning. But that is strictly speaking in regards to the Advance paint. Hope this helps!
Abby's Mom
April 15, 2013 at 2:38 amI'm in the exact same boat as Lulume. Would love to know what you think!
Nancy
May 8, 2013 at 6:37 pmOh. My. Gosh. This post is fantastic!! I have bookmarked it to review again later. We bought paint already…but that's it. 🙂 Looks like it will take us all summer…and I have an 8 month old, so cereal for supper is not an option. Darn. 🙂
Chris
May 10, 2013 at 1:29 amHi Jenny, thanks for the detailed explanation of your project. We are considering painting our maple cabinets, but were worried that the paint finish wouldn't hold up as well as a factory painted finish. Can you tell me how the finish has held up since you are now over a year since they were done? Any flaking or wearing?
Nancy
May 26, 2013 at 4:38 amJenny,
Your instructions are excellent. I have oak cabinets that I am going to paint, but I'm worried that the heavy oak grain will show through the paint. Were your cabinets oak or a different wood and what if any advice do you have about my concern.
WendynSonny Kommany
June 8, 2013 at 12:32 amLove your tutorial, and just to be sure… You recommend that I wait one month before I install the doors? Thanks
Robin G.
June 12, 2013 at 4:40 amI am halfway through my cabinet painting project with inspiration from your blog. I bought the paint sprayer and the #4 tip (based on the advice of the Gleem guys, but it did do better IMO), Fresh Start Primer and the Advance Paint. Starting with my cabinet frames first (due to an unfortunate leak that precipitated the emptying of my cabinets and subsequent repairs), I did two coats of primer. This was in hopes to reduce the visible grain of my oak cabinets. It also gave me lots of practical experience with the spray gun until the main event of the Advance paint. You're right, it goes on like butter… wow.
Now that I have my kitchen operational again, I will begin on the drawers then doors. I have scoured the web for instructions, and I believe yours are the best.
Can't wait to get my kitchen back to where it needs to be. Thanks for your help!
Jenny
June 12, 2013 at 10:45 pmDoing more than one coat of primer on oak cabinets definitely helps. I am "this close" to posting the oak cabinets I did for a friend/client. They turned out beautifully! My paint guy gave me a suggestion for a product to use on oak cabinets that is supposed to help keep the grain from coming through. I am hoping to use it on my next project.
Good luck, and I would love to see the finished product!
Ramesh chauhan
July 27, 2013 at 10:46 amTHANKS FOR THE LOVELY COMMENTS! I AM GLAD YOU LIKE THE POST ASWELL! MORE TO COME!
Kitchen cabinets NJ – Best Stone is a kitchen cabinet supplier in NJ and PA. Granite countertops in NJ & PA. Pennsylvania and New Jersey kitchen cabinets and granite countertops.
Tammy
September 30, 2013 at 12:56 amI have saved this post for a year knowing that I would use it one day. I finally painted my kitchen and saved a total of $2950 because of your post. The only thing I have left is painting my walls and I have been pouring over paint colors for what seems like forever. I LOVE your wall color. Can you tell me what color it is? Thank you so much again for posting this step by step process.
Tammy Pearson
whsbb99
February 17, 2014 at 7:21 pmThis blog inspired me to paint my own cabinets and they turned out phenomenal. If I could add my 2 cents to anyone contemplating this, i say go for it. It's a lot easier then you think. The paint spray is extremely forgiving. I purchased the same sprayer and paint as the blogger. It's a bit harder to clean than she says, but the finish it provides is worth it. I found that i had to thin the advance paint about 10% to keep the spray mist nice and fine. I used the stock #3 projector set. I also found sanding to be almost unnecessary. I only had to sand off the errant dog hair or paint smear from handling the cabinet doors.
If you are limited on space i suggest building a drying rack out of rows of 2×4's nailed horizontally on 2 vertical 2×4's with a base support. Use finish nails like the blogger to elevate the panels.
Thanks Jenny for all of the great help!
Jenny
February 17, 2014 at 7:49 pmI am always happy to hear that others have had success with my tutorial! And yes, cleaning the sprayer is probably my least favorite part of the otherwise awesome spray gun, but definitely worth the end result. I would love to see any photos you have of your kitchen redo! Thanks for sharing!
Krista Butler
March 18, 2014 at 6:57 pmDo you have any Espresso brown paint and glaze suggestions for my island redo? I'm making my builder grade oak island look like a piece of furniture. That's the plan anyway! I saw someone use a chocolate brown paint and a black glaze. Suggestions?
Jenny
March 18, 2014 at 8:22 pmI would suggest looking into the General Finishes line of stains. They have great products that give oak a whole new life, and they're really easy to work with – very little prep required, and the finished product is fantastic! I used their stain on my front doors, breakfast bar and dining room built-ins. Here is a link to one of the posts:
http://evolutionofstyleblog.blogspot.com/2013/10/front-doors-stain-without-pain.html
Jason Knight
April 3, 2014 at 7:28 pmI love the way that your cabinets turned out. I should repaint my kitchen cabinets this spring once it warms up. I have been noticing quite a few chips in the paint recently.
Jason|http://www.canlikkitchens.net/
buzzCus.com
April 4, 2014 at 9:07 amSuch a good article. These tips are so helpful to KIDS. I found one more site related to kids articles. Please learn more about your KIDS here kidsvedas.com
Toni Markin
April 23, 2014 at 11:07 pmGorgeous kitchen makeover. Thanks for the great tutorial.
Any downside in not taping and covering the insides of the cabinets and just spray painting the insides as well? I'm lazy and thinking of skipping that step. 🙂
Simon Adair
April 28, 2014 at 4:44 pmI could easily seeing this as a more affordable way of doing cabinets. Don't get me wrong, I want to replace my cabinets like everyone else. However, painting can be a good way to hold you over until you can afford it.
http://mustangbuilderscorp.com/custom-cabinetry/
katysewell12
April 30, 2014 at 3:46 pmThis was such a great and helpful tutorial. I've though of trying to update my cabinets by myself, but I don't know if I will be able to do so. Do you happen to know of anyone near Clayton, NY that can help me with installing new kitchen cabinets? http://www.garlocks.com/design/?page_id=7
Emily Ross
May 12, 2014 at 7:35 pmIt’s been over 10 months since I’ve remodeled my kitchen and the compliments received from my family and friends just keep coming. I hired the team at Classic Kitchen and Bath in Illinois because they are a family business and have been around for as long as I can remember. Remodeling can be quite a hassle but these guys made the process much simpler for me. It was a great experience working with the team at CKB- a company that prides itself on quality workmanship, timeliness, and customer service. Visit their website today http://www.myclassickitchenandbath.com or call 630-515-9151. I highly recommend them to anyone considering a new kitchen or bathroom.
OSr Group
May 28, 2014 at 6:28 amHi!
Love your Kitchen!!!!
Block Board Manufacturer in India, Flush Door Manufacturer in India
Julia Carlson
May 29, 2014 at 1:30 amThis is an amazing tutorial! Your cabinets look amazing. I will have to try this when I have the time. http://www.kitchencabinetsdesigncolorado.com/Remodeling-Services-Colorado-Springs-CO.html
Carolina Mora
May 30, 2014 at 8:17 pmJenny,
Your kitchen looks so beautiful! I'm half way through my kitchen now. Using Advance from BM for the inside of the cupboards and Rust-Oleum Cabinet Transformations Kit for the doors and visible parts. It is A LOT of work. No kidding, my husband has a different kind of pizza every night for supper. A lot of patiente and yes, advice from the experts and a spray gun definitely makes a huge difference!
Abed Nadier
June 4, 2014 at 3:05 pmThis is awesome! You did an awesome job painting your cabinets! My wife wants to paint ours, but I think it would be a better idea to just replace them. They're pretty old, so painting them seems like it would just be a waste of time and money. http://www.hawthornekitchenscanada.com
Jenny C
June 8, 2014 at 6:34 pmGreat work! I am planning on doing my cabinets next week.. Quick question.. Did you sand with an electric sander or just bare hand? We just moved into a house with cabinets that someone obviously tried to paint themselves and it is chipping off. Do I need to sand that paint layer all the way off?
Jenny
June 9, 2014 at 1:46 amI just used a sanding block to sand mine, but in your situation, I would remove as much of the obvious chipping paint as possible (using an electric sander if necessary), and try Sherwin Williams' PrimeRx Peel Bonding Primer to help prevent any further chipping as you get ready to repaint them. I hope this helps! Good luck!
Jenny C
June 9, 2014 at 7:33 pmAmazing job!
I'm painting my cabinets next week using your method. My only question is did you use an electric sander or just lightly sand with your hand? We just moved into a house that someone has clearly tried to DIY the cabinets. The paint is chipping off. Do I need to sand that whole layer of paint off?
Thanks for your help!
Jenny
June 9, 2014 at 7:39 pmJenny C, I hope you're getting my replies, because your email address isn't coming through with your comment.
I just used a sanding block to sand mine, but in your situation, I would remove as much of the obvious chipping paint as possible (using an electric sander if necessary), and try Sherwin Williams' PrimeRx Peel Bonding Primer, Zinsser's Pell Stop or XIM's Peel Bond to help prevent any further chipping as you get ready to repaint them. I hope this helps! Good luck!
CK Bost
July 4, 2014 at 6:18 amI have your blog saved as our go to. We are currently working on our kitchen! Right now my husband built a "home" for our fridge, and we are debating moving the microwave and doing a hood range. But that is super stressful thinking ab it so we may move microwave back over the stove. He is going to build up the trim and add panels to the side. We are def going to use BM advance paint and we are ordering the same sprayer you used….but wondering what primer i should use since some of our wood is finished maple…and some is unfinished (from the additional wood work he is adding on) Also…how are your cabinets holding up now? You did a beautiful job!
Jenny
July 4, 2014 at 3:54 pmThanks for your kind words, and I'm happy you're going to use my tutorial to do your own kitchen! As for the primer on unfinished wood, you can use the Benjamin Moore Fresh Start for unfinished wood as well. I have some cabinets that I'm working on now that are unfinished, and that is the method I'm using. You just might have to do some additional sanding on the unfinished wood to smooth it out. Good luck! I would love to see the finished product!
Thomas Watson
November 26, 2014 at 11:48 amI received estimates on painting my small kitchen ($2300-$4000). Yikes! I want to do them myself, but have been afraid. Thanks to you I'm gonna do it!
Liu Tao
December 9, 2014 at 12:01 pmBeautiful! Thanks for the tips!
bryan flake
December 12, 2014 at 3:15 pmMy wife wants me to repaint the kitchen cabinets. I am not sure what the best type of paint is though? In my mind, I would just buy the same paint for walls as I would for cabinets. Maybe I should just go to the hardware store and ask them.
http://www.hawthornekitchenscanada.com
Leyo
January 12, 2015 at 12:27 pmThis is the perfect tutorial. Simple and beautiful, exactly what I need to start in on my kitchen renovation. It's a beneficial blog. kitchen cupboards
Albert einstien
January 23, 2015 at 7:08 amHaving studied this I considered this post was very edifying. I appreciate you have put the nice efforts in this blog. housekeeping
Emily Brooklyn
January 29, 2015 at 1:47 amyou choose a good color for your cabinet. white kitchen cabinets seem to be good ideas and tips. good job. looks beautiful!
Marcus Morgan
February 2, 2015 at 11:33 pmWe are in the process of remodeling the kitchen in my parents home. We have pretty much finished everything we just have to paint the cabinets. So I am researching to see what is the easiest way to do it. This blog was super informative and explained it really well with great detail. http://www.woodworkingbyerminio.com